The following article introduces the possibilities of the popular Hunter Hydrawise irrigation system. This is cloud-based and is used on the web-enabled Hunter Hydrawise computers HC, Pro-HC, HPC, HCC and the X2 in conjunction with the Hunter Wand module. In principle, all of the functions presented can be used regardless of the computer model used; there are only restrictions on individual small details. In this case, this will be pointed out separately in the article.
The Hunter Hydrawise system is used via the Hydrawise app for Apple and Android devices. Alternatively, it can also be accessed directly via the web browser.
When you start the system for the first time, a setup wizard guides you through the individual steps. If you have fairly simple requirements, this can be enough. If not, the system allows you to make very extensive adjustments. Below is a detailed overview of how the Hunter Hydrawise system works and what can be adjusted.
Watering Triggers
The watering trigger menu essentially contains the heart of the Hydrawise system. Here you can choose from a range of watering rules that you can adapt to your own needs. On the one hand, these rules rely on historical precipitation data from a virtual weather station and, on the other hand, on predicted local weather values (precipitation, temperature, wind, humidity) based on data from the Weather Company (weather.com). Irrigation based on these predicted values is called “predictive watering” at Hydrawise. The virtual weather station means that Hydrawise obtains the weather data via the Weather Underground service from a nearby airport weather station. Hydrawise has a total of 10,000 different airport weather stations to choose from.
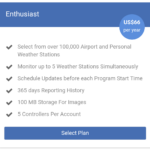
If you upgrade from the Home to the Enthusiast plan, Hydrawise obtains the data from up to 5 different nearby weather stations and consolidates them into a common virtual weather station in order to be able to provide even more reliable data. In this case, private weather stations are also available and you can choose from a total of 120,000 private and airport weather stations. This upgrade to the Enthusiast Plan costs 66 USD per year and can be completed through Account Settings. With the Enthusiast plan it would also be possible to choose a self-operated weather station. To do this, it must first be added to the Weather Underground service and can then be selected.
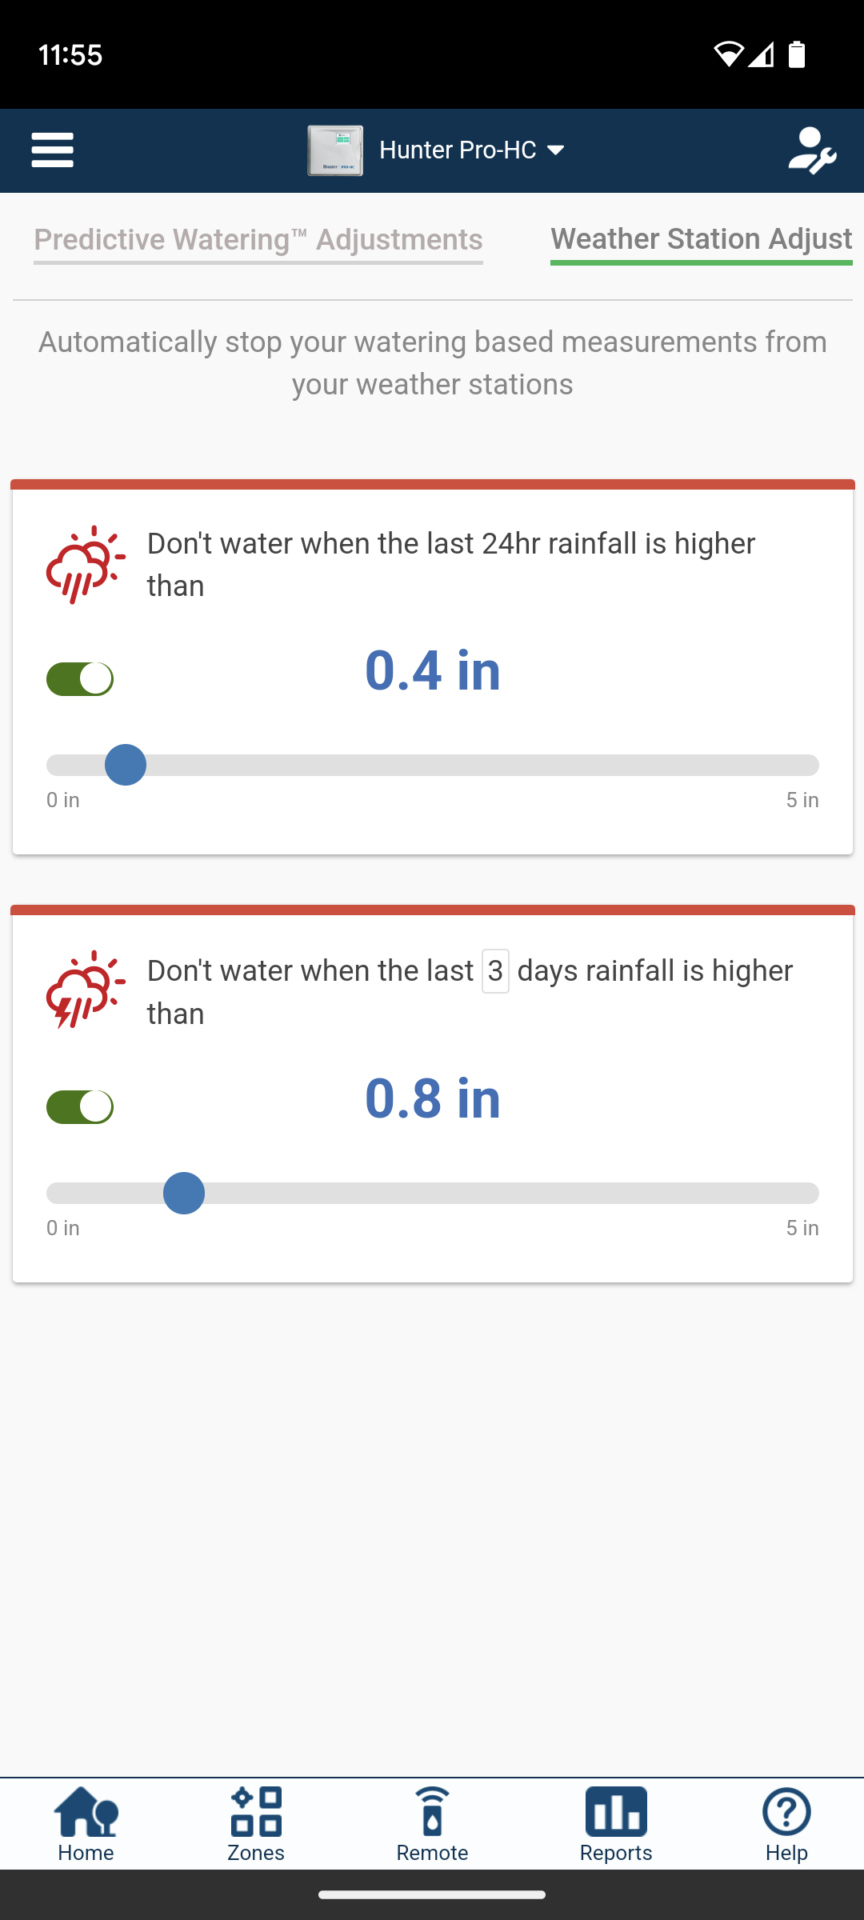
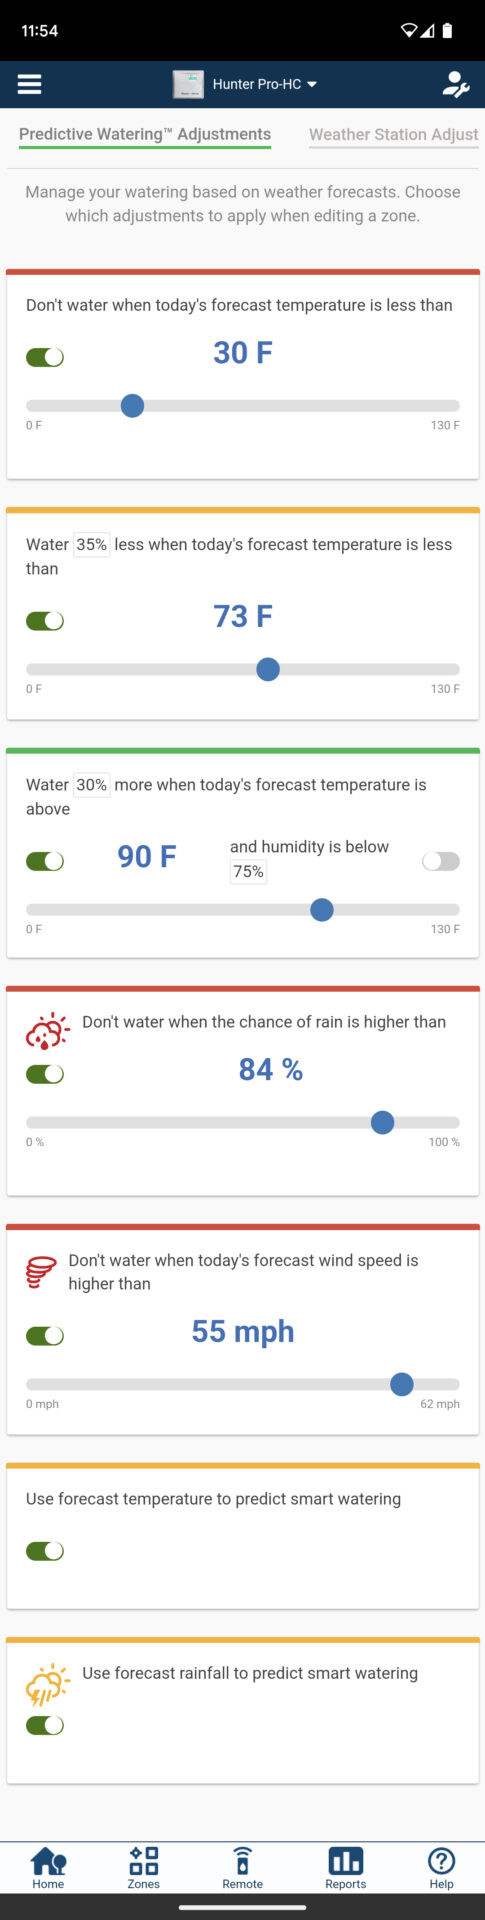
You can define 2 rules from the measured precipitation data from the virtual weather station, and 6 rules can be stored based on the predicted weather values from weather.com. 5 of these rules ensure that irrigation is stopped when the rule arrives:
The temperature forecast is below a certain number of degrees
The chance of rain exceeds a certain percentage
The predicted wind speed exceeds a predefined level
The day before it rained more than a predefined amount
In the previous three days it rained more than a predefined amount
For example, if you have defined that there should be no irrigation if there was 1 inch per square meter or more of precipitation the day before and it rained 1.1 inches the day before, then irrigation will be canceled. Only the subsequent planned irrigation takes place again. Before this, it is checked again whether one of the rules applies. So if it rains enough for weeks, then there will be no irrigation for weeks.
You can set the values according to your own ideas. And you can activate or deactivate the rules. If a rule is deactivated, it will not be available for selection when a zone or program is created and therefore cannot be used. Conversely, activation does not mean that the rule is used; it must also be selected when the zone or program is created. Here you only define whether it should be available for selection and what the limit values should look like.
Two of the rules lead to longer or more frequent watering:
Reduce watering time by a predefined percentage if the temperature forecast is below a certain value
Water by a predefined percentage more when the temperature forecast is above a certain value and the humidity is below a certain value (whether this rule, if applicable, results in a longer watering time or additional watering runs can be defined in detail when creating zones and programs)
According to Hunter, the data used for the adjustment is automatically transmitted between midnight and 2 a.m. Approximately 1 hour before the start of the first watering run of the day, the watering schedule is then updated based on this data. If you have taken out the paid subscription to the Enthusiast Plan, the weather data will also be determined and the irrigation plan updated one hour before each other program start of the day. In this way, very current data can be included in the decision-making process.
Rules based on weather station data
Rules based on future forecasts using data from weather.com. Here you can also set whether only temperature forecasts or also precipitation forecasts should be used for the Smart Watering mode.
Applicability of irrigation rules
Not all rules are possible in every application scenario. Depending on the irrigation modus selected, the following rules can be used:
Rule
Time based watering type
Smart (ET) Watering
Virtueller Solar Sync
Do not irrigate if rainfall in the last 24 hours is greater than x inches
Yes
No
Yes
Do not irrigate if rainfall over the last x days is greater than x inches
Yes
No
Yes
Do not water if the temperature forecast for the day is less than x degrees Fahrenheit
Yes
Yes
Yes
Irrigate x percent less if the temperature forecast for the day is less than x degrees Fahrenheit
Yes
No
No
Irrigate x percent more if the temperature forecast for the day is higher than x degrees Fahrenheit and humidity is below x percent
Yes
No
No
Do not irrigate if the probability of precipitation is greater than x percent
Yes
No
Yes
Do not irrigate if the wind speed forecast for the day is greater than x mph
Yes
No
Yes
Use temperature forecasts to predict smart watering
No
Yes
No
Use rainfall forecasts to predict smart watering
No
Yes
No
Selection of programming mode
Hydrawise offers you two modes to choose from:
Standard mode
Advanced mode
Standard mode is the programming mode traditionally used in the irrigation sector, advanced mode is the mode that was newly introduced by the company Hydrawise. After Hunter took over Hydrawise, the customer is now offered both modes to choose from. Except for the Hunter HC, which was designed by the Hydrawise company back then, in which only the advanced mode is possible.
Which of the two you prefer is to a certain extent simply a matter of taste. In standard mode, hardly anything can be defined about the zones themselves, apart from their names; all the settings such as running time, start time and additional settings happen when defining the irrigation programs. In advanced mode, however, the running time and additional settings are defined in the zone; only the start time is then specified in the program. Some functions or additional features can only be used in one of the two modes. Below is an overview of the main differences:
Topic/Function
Standard Mode
Advanced Mode
Industry standard
Yes
No
Zones can have several different running times
Yes
No
Irrigation programs can have multiple start times
Yes
No
Irrigation programs can be named
Yes
No
Creation and use of irrigation templates
No
Yes
Using the Smart Evapotranspiration option to determine when irrigation occurs
No
Yes
Using the Water More Often When It’s Hot Option
No
Yes
Standard mode gives you somewhat more options if you need to create more complicated irrigation programs. For example, if a zone should not always be watered for the same number of minutes, but rather 20 minutes on Monday and 40 minutes on Wednesday. It would not be possible to store this in the advanced mode because the running time is determined once for each zone. In return, a few of the additional smart options such as Smart (ET) mode can only be used in advanced mode. You don’t have to do without the basic possibilities of the mode itself, even in standard mode, you just need to set the individual “predictive watering” rules so that they achieve the same result. You just can’t rely on a ready-made “automatic” system here.
Both modes will normally be suitable for the usual requirements. Only if you have more unusual wishes can it happen that these can only be implemented in one mode or the other. You can change the mode at any time after you have made your choice, even later. Practical: The zones already created in the other mode are retained. Information will only be shortened or expanded if necessary. The programs must be created separately in each mode. However, the system remembers the programs created in the previously used mode in the background, so that you do not lose any information by switching the mode back and forth, but can return to the previously used status.
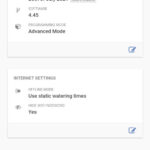
In the controller settings, the programming mode can be changed by clicking on the edit symbol.
Programming the irrigation schedule
These settings are made in the “Zones & Programs” menu. How exactly this works and what options are available to you differs quite significantly depending on the mode you choose. What is the same regardless of the mode is the maximum number of 6 programs that can be set, each with a maximum of 6 start times (exception: Hunter Wand: max. 3 start times). How many zones can be created depends on the computer model used, i.e. a minimum of 6 to a maximum of 54, depending on how many zones the computer hardware supports.
Due to the quite large difference, I explain the programming separately first for the more extensive Advanced mode and then for the Standard mode.
Programming the irrigation schedule in advanced mode
Add zone
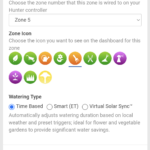
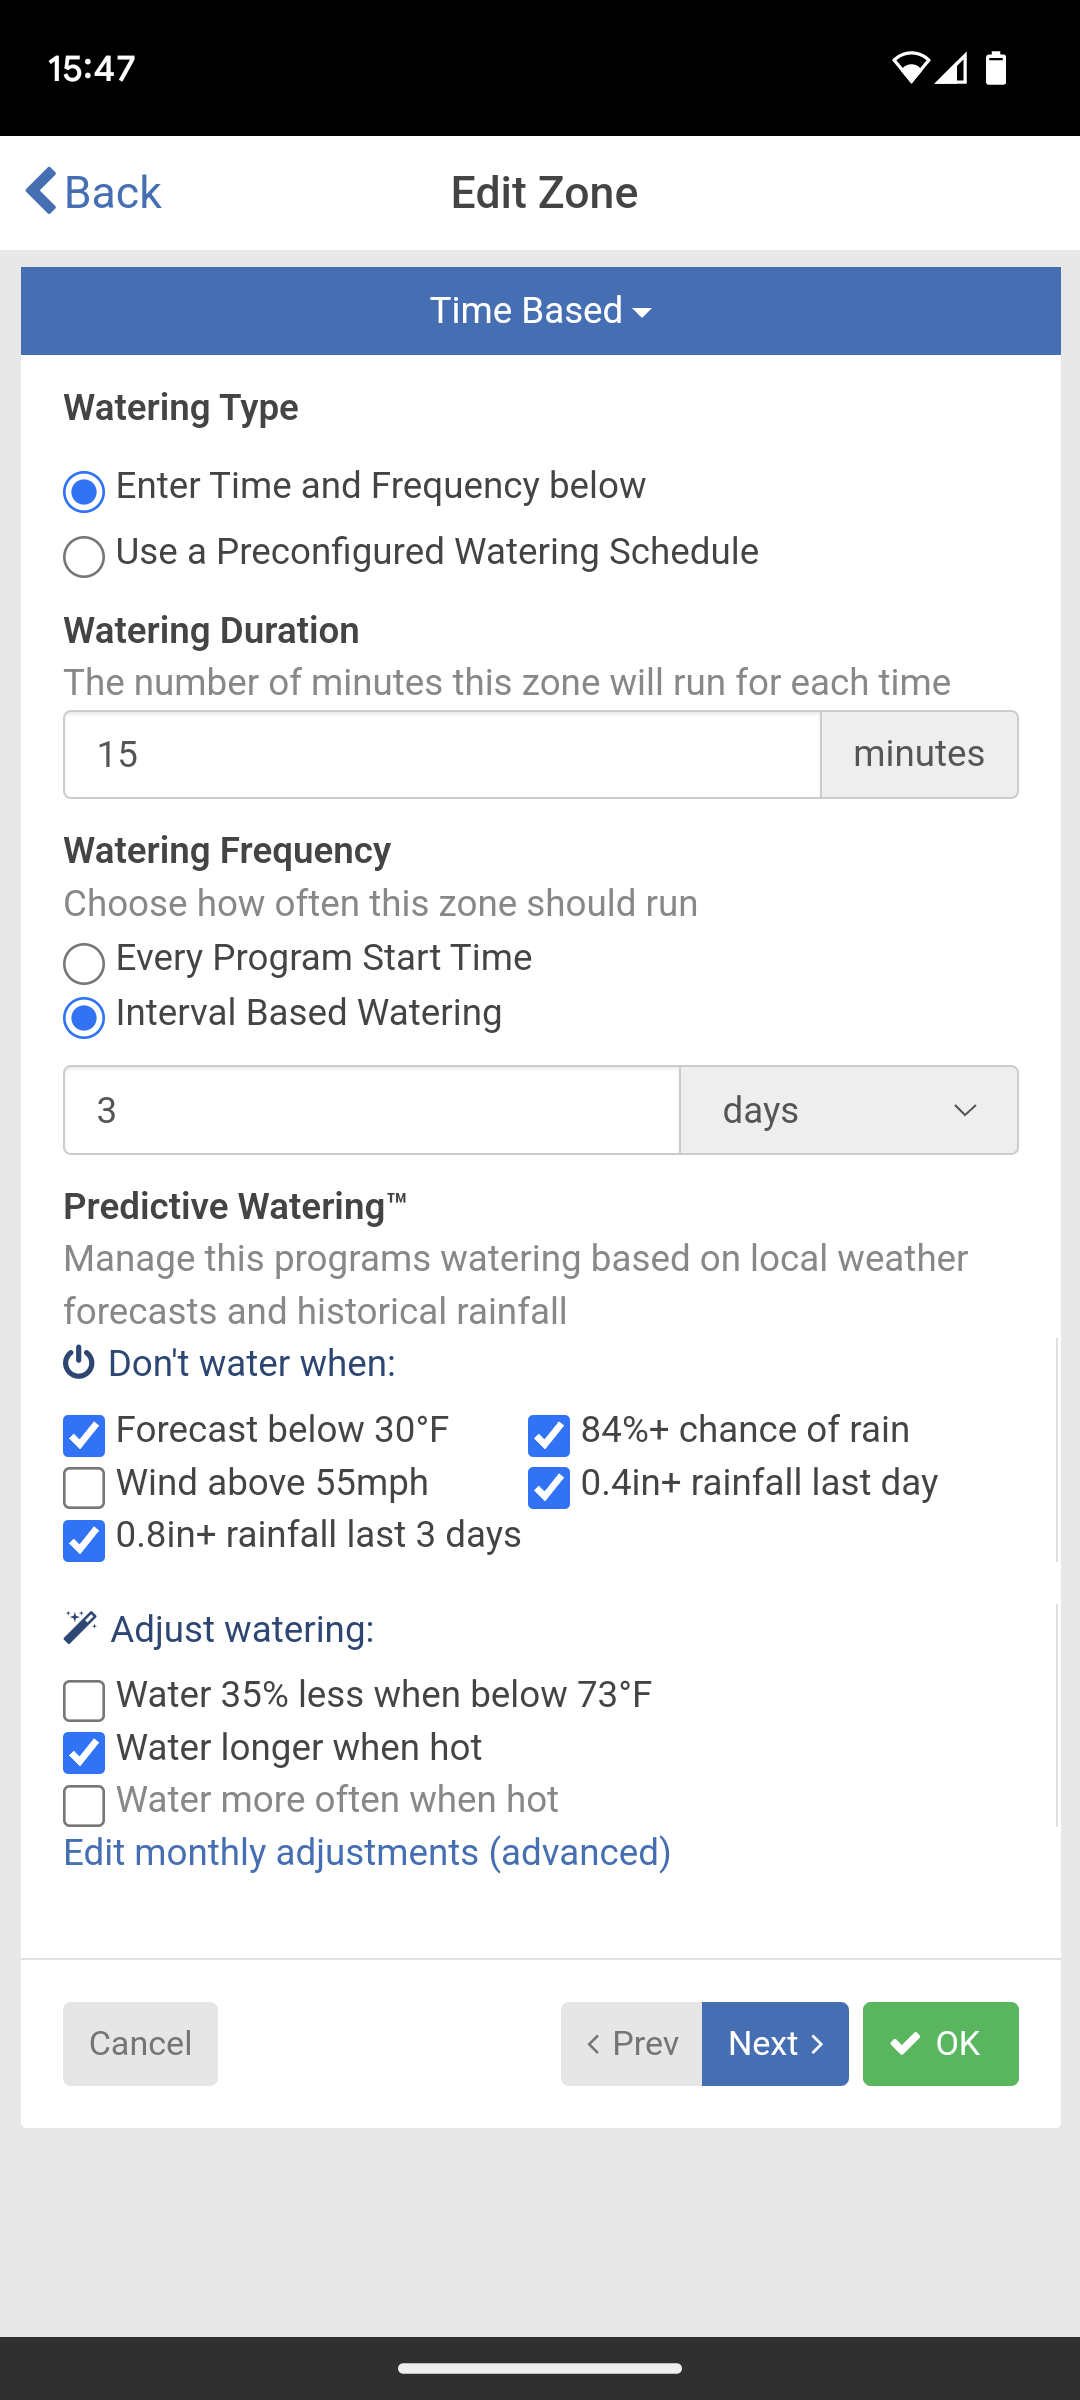
Step 1: Enter basic data
Naming the zone
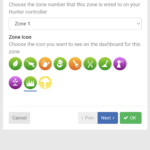
Selection of which zone output should be used
Selecting a zone symbol
Selecting an irrigation type
Entering the zone basic data
The naming of the zone and the assignment of a zone symbol serve to better identify and differentiate the individual zones. If you want, you can upload a photo of the zone later.
Setting the zone number determines which zone output on the Hunter controller the zone should use. For example, if you have 6 zone outputs available, you can choose a number between 1 and 6. Numbers that have already been selected for another zone cannot be assigned again.
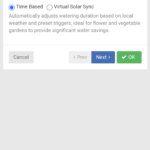
In advanced mode, in addition to the standard type “Time-based irrigation plan”, you can choose from the following two irrigation types:
Smart (ET) type
If this irrigation type is selected, the system automatically determines when to irrigate based on precipitation and evaporation. It automatically takes these values from the connected virtual weather station for the past or extrapolates them for the future from the weather.com online source used. An average, sandy soil is assumed. The values to be entered in the next step differ from the time-based irrigation plan because certain selections are not possible due to the choice. Note: Smart (ET) schedule is not possible in standard mode.
Virtual Solar Sync
When Virtual Solar Sync is selected, the system simulates the use of a Solar Sync Sensor. Instead of a physical sensor, however, the data from the virtual weather station or weather.com is also used. Depending on the projected evaporation values (evapotranspiration), the system automatically adjusts the running time of the programmed irrigation runs.
Which irrigation type is right for you? There is no one best type among the three offered. According to Hunter, in principle the same water savings can be achieved with all three. Which one you choose depends on your own requirements and also on how much you want to deal with the system itself or how much you want to leave to fixed program logic.
Choosing a time-based irrigation plan offers you the opportunity to plan the irrigation program in great detail according to your own specifications. The days on which watering should take place as well as the start time and duration of watering can be set precisely. And you can define exactly which weather-dependent parameters should ensure that irrigation is canceled, added or takes place longer or shorter. If something doesn’t work exactly according to plan, you can adjust the parameters very finely and get closer and closer to the desired result. Conversely, this mode also requires the most attention to the options offered by the system if you want to exploit the full potential.
The Smart (ET) Schedule makes many decisions for you. You just need to define how long the irrigation run should be and how many days apart it should take place during the peak period (= hottest time). The system obtains the necessary weather data online and uses it to calculate the evaporation relevant to the irrigation location on a daily basis. In this way, it calculates, just as a connected soil moisture sensor would, what moisture there is in the soil at the current time and when watering needs to be done again. So watering is not done on fixed days, but rather the system determines these independently. The irrigation duration, however, remains at the predefined value and is not adjusted, which can be advantageous if you value intensive irrigation that moistens the soil down to the roots.
Virtual Solar Sync mode works very similarly to Smart (ET). Again, based on rainfall and evaporation, the watering schedule is automatically adjusted. However, in this case this happens as it would if a physical Solar Sync sensor was used. Watering is carried out on fixed days specified by the user, but the length of watering is adjusted based on the weather data. This is particularly advantageous if you have to or want to water on specified days and don’t want to water on the other days. For example, if it is agreed with the municipality that watering is only allowed on certain days or if you share a common pump with neighbors.
These steps must be carried out if the irrigation type “Time-based irrigation schedule” was selected when creating the zone:
Choose between defining time and frequency or using a preconfigured watering schedule
If using a watering schedule was selected:
Choice of desired schedule. Most of the other settings are then no longer necessary as these are taken over from the predefined plan.
If Time and Frequency Definition is selected:
Enter the watering duration in minutes
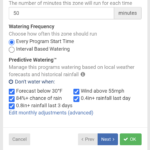
Selection between irrigation at every program start and interval based irrigation
Activation/deactivation of the predictive watering triggers
Setting a monthly adjustment
Definition of a time-based irrigation plan that is started depending on the programs created
Definition of a time-based irrigation plan that is started at a specified interval
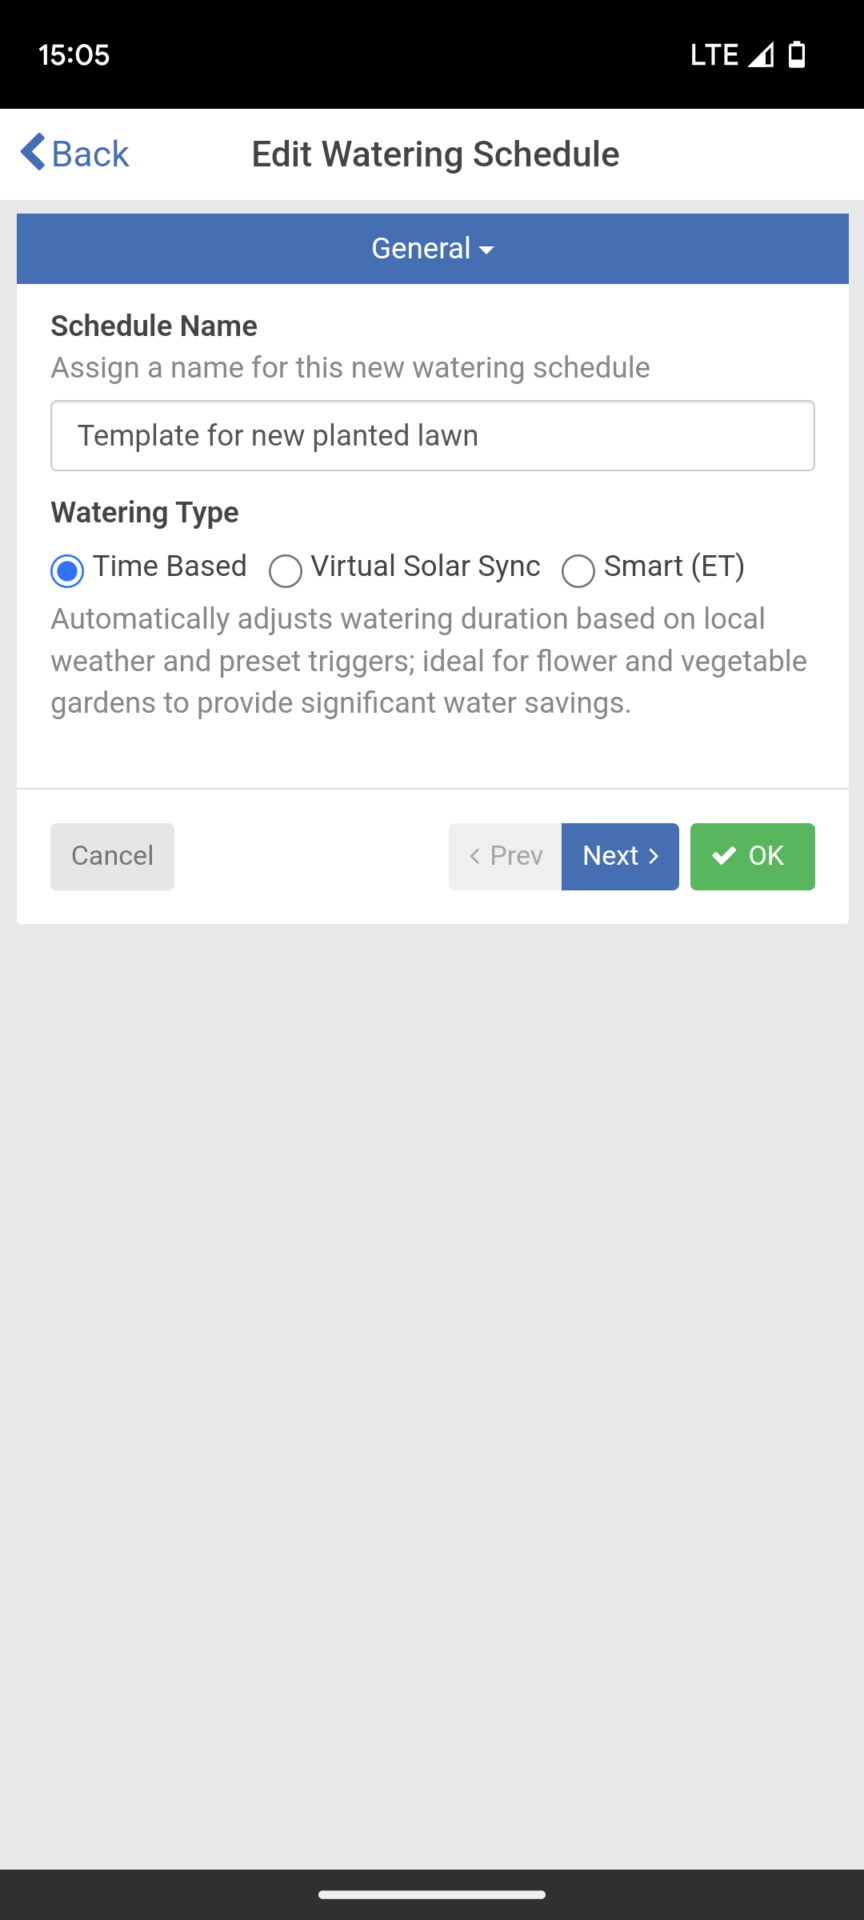
If you select the option “Enter Time and Frequency below”, then the start time and how often the zone should be irrigated must then be defined. If the “Use a Preconfigured Watering Schedule” option is selected instead, the values from a template can be used so that no new definition is necessary. Provided you have created a suitable template beforehand or if your own garden is looked after by an irrigation company, they can also make their in-house templates available to their clients. The purpose behind it: You don’t always have to think about which settings are best, but you can use predefined settings for a specific application, practically like a template that you use again and again. If you create such settings yourself, it also has the advantage that you only need to define them once and then you can use them again and again for different zones. A possible template would be, for example, “Law was newly planted,” in which the appropriate irrigation settings for a newly created lawn that needs to be watered very often at short intervals are then explicitly stored. From now on, if you plant a new lawn in a zone, you can use this template for the necessary settings.
When it comes to irrigation frequency, you can choose between depending on the programs you have created (these are defined afterwards) and a fixed interval entry. The first option is shown on the left in the previous screenshot, the second on the right. The interval entry is somewhat misleadingly named: If you enter 3 days, this means that the water will be irrigated every 3 days. Optionally, you can also switch to weeks or define how often you want to water per day.
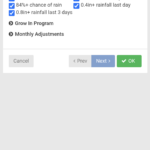
In the “Predictive Watering” section you can specify which of the previously defined trigger rules should be applied to the zone by checking or unchecking them. There are 5 different triggers to choose from that prevent watering from occurring and three that lead to additional watering runs or to an extended or shortened watering time.
The exact limits are defined separately in the “Watering triggers” menu as described above. At this point you just define which of the rules should be taken into account. There is one more rule to choose from than can be defined in the Watering Trigger menu. This is because the rule “Water x% more if the temperature forecast for the day is higher than x degrees and the humidity is below x degrees” can be applied in two ways: If you choose “Water longer when hot” the running time of the irrigation runs is increased in order to follow the rule. If you select “Water more often when hot” then the additional irrigation requirement results in an additional irrigation run. To do this, it is necessary to define a second, optional start time, which in this case would be used for additional irrigation.
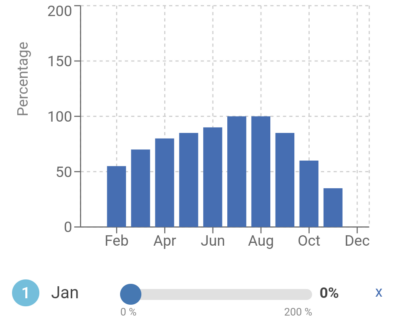
Monthly adjustment
In addition to the Predictive Watering rules, a monthly adjustment can be defined for the zone. This increases or reduces the programmed running time of the irrigation in a certain percentage ratio on a monthly basis. This means you can automatically water for a shorter time in the cold months and longer in the warm months.
Each month it can be defined that 100% of the running time (= as programmed) or more or less is watered
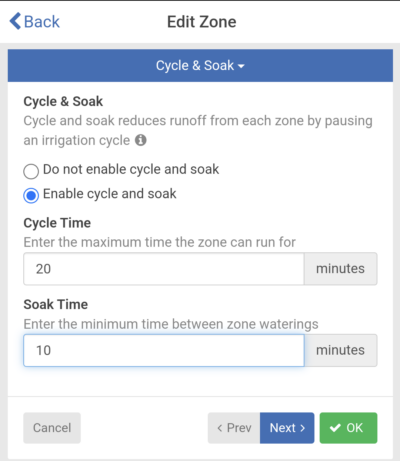
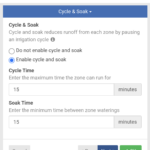
Cycle and soak phases
Using this option it is possible to extend the irrigation time, which is then divided into irrigation phases and pause phases. This can be useful if you are irrigating a clayey soil where the water takes a long time to be absorbed into the soil. Or even when irrigating sloping terrain. You define the maximum amount of time you should water in one go and how long you should allow a break afterwards to give the water a chance to seep in. In this way, as much of the water as possible actually reaches the ground and as little water as possible is wasted.
Adjustment of cycle and soak time
If only one zone is programmed at the start time, then the running time of the zone is simply extended accordingly. For example, if a start time of 4:00 p.m. and a watering duration of 1 hour are stored and you have defined a maximum cycle time of 20 minutes and a soak time of 10 minutes, then this would lead to the following process:
4:00 p.m.: Start irrigation and run the irrigation for 20 minutes 4:20 p.m.: 10 minute break 4:30 p.m.: 20 minutes of watering 4:50 p.m.: 10 minute break 5:00 p.m.: 20 minutes of watering 5:20 p.m.: End of irrigation
In the example, the entire irrigation run would take 20 minutes longer.
If several zones are programmed at the start time, they would alternate so that the overall running time would not be extended. Let’s assume that zones 1, 2 and 3 are programmed with a start time of 4:00 p.m. and each have a watering duration of 1 hour. As before, the maximum cycle time should be 20 minutes and the soak time should be 10 minutes. The process here would be as follows:
4:00 p.m.: Start zone 1 and run the irrigation for 20 minutes 4:20 p.m.: zone 1 stops, zone 2 starts and 20 minutes of watering 4:40 p.m.: zone 2 stops, zone 3 starts and 20 minutes of watering 5:00 p.m.: zone 3 stops, zone 1 starts and 20 minutes of watering 5:20 p.m.: zone 1 stops, zone 2 starts and 20 minutes of watering 5:40 p.m.: zone 2 stops, zone 3 starts and 20 minutes of watering 6:00 p.m.: zone 3 stops, zone 1 starts and 20 minutes of watering 6:20 p.m.: zone 1 stops, zone 2 starts and 20 minutes of watering 6:40 p.m.: zone 2 stops, zone 3 starts and 20 minutes of watering 7:00 p.m.: End of irrigation
The total irrigation running time would therefore not change because the break in one zone is used to irrigate the other.
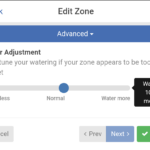
Water adjustment
Last but not least, an option is offered with which you can increase the irrigation times for the zone globally by a certain percentage. This can be useful if you notice that the current settings are watering a little too much or too little, but you don’t want to adjust the watering in detail, but simply want to make a quick adjustment up or down. This option makes no sense in the initial creation of a zone, because then you could simply define the duration as longer.
By moving the slider, watering times can be extended or shortened by up to 100%
Step 2 – Option 2: Define Smart (ET) Schedule
The following steps must be carried out if the “Smart (ET)” irrigation type is selected instead of a time-based irrigation plan when creating a zone:
Choose between defining time and frequency or using a preconfigured watering schedule
If using a watering schedule was selected:
Choice of desired schedule. Most of the other settings are then no longer necessary as these are taken over from the predefined plan.
If Time and Frequency Definition is selected:
Enter the watering duration in minutes
Selection between irrigation at every program start and interval based irrigation
Activation/deactivation of the predictive watering triggers
Setting a monthly adjustment
Definition of a Smart (ET) schedule that automatically controls irrigation based on calculated evaporation
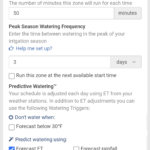
In Smart (ET) mode, the irrigation duration is specified by the user; the system independently adjusts at what intervals and on which days the irrigation takes place. For this purpose, the reference value is specified as to how often irrigation must be carried out at the absolute peak time. So if the sun burns down at 95 Fahrenheit for a week in midsummer, how many days apart should be irrigated? Optionally, you can switch the selection from days to weeks here.
The box “Run this zone at the next available start time” can be checked if the first watering is already overdue, meaning the plants or lawn are already thirsty for water. Otherwise, the automatic system would only plan the first watering in a few days instead of starting immediately.
In the “Predictive Watering” menu item, there are significantly fewer options to choose from in Smart (ET) mode than if you define the irrigation completely manually, since the automatic system takes over a large part of the decisions. You can specify that watering should be stopped completely at a certain outside temperature. You can also define which parameters the Smart (ET) automatic system should work on. You can choose whether it should only use evaporation values (forecast ET ) or also precipitation values (forecast rainfall). What leads to better results may vary from case to case in practice and is best tried out.
Monthly adjustment
A monthly adjustment can also be defined in Smart (ET) mode (for an explanation of this, see the time-based irrigation plan above).
Cycle and soak phases
Likewise, irrigation can be divided into cycle phases and soak phases (explanation also as before).
Water adjustment
And you can also increase or reduce the irrigation globally by a certain percentage for fine-tuning (explanation also as before).
Step 2 – Option 3: Define Virtual Solar Sync Mode
The following steps must be carried out if the “Virtual Solar Sync” irrigation type is selected instead of the two previously described options when creating a zone:
Choose between defining time and frequency or using a preconfigured watering schedule
If using a watering schedule was selected:
Choice of desired schedule. Most of the other settings are then no longer necessary as these are taken over from the predefined plan.
If Time and Frequency Definition is selected:
Enter the watering duration in minutes
Selection between irrigation at every program start and interval based irrigation
Activation/deactivation of the predictive watering triggers
Setting a monthly adjustment
Definition of the zone in Virtual Solar Sync mode
Unlike in Smart (ET) mode, the irrigation duration is adjusted automatically here. The irrigation duration entered serves as a reference value; this is lengthened or shortened depending on the calculated evaporation. Following the same principle as using a Solar Sync Sensor with the irrigation computer. The system does not change the specified days, so you can rely on the fact that there will be rain on these days.
In the “Predictive Watering” menu item, not all eight possible options are available in the Virtual Solar Sync mode, but with 5 options, significantly more manual intervention can be done than in the previously described Smart (ET) mode.
Monthly adjustment
A monthly adjustment can also be defined in the Virtual Solar Sync mode.
Cycle and soak phases
Likewise, irrigation can be divided into cycle phases and soak phases.
Watering adjustment
And you can also increase or reduce the irrigation globally by a certain percentage for fine-tuning.
Add program
A program is always created in the same way, regardless of which mode (time-based irrigation plan, Smart (ET), Virtual Solar Sync) the zone was defined in.
Step 1: Enter program data
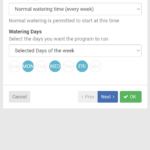
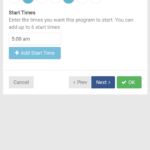
Enter start time
Selection of watering type
Selection of watering days
Definition of program data
Entering the time at which the program takes place with a 12 hour clock. So up to and including 12 noon with the addition of “am” and after 12 noon with the addition of “pm”.
The watering type can be selected between normal weekly irrigation, irrigation only in even weeks, irrigation only in odd weeks and low priority irrigation time. A low priority irrigation time is only used if the system needs to schedule additional watering runs in addition to the scheduled watering runs (“Water more often when hot” option).
When selecting the irrigation days, you can choose between “Selected days of the week”, “Even days” and “Odd days”. If you choose “Selected days of the week”, you can specify whether you want to rain for each day from Monday to Sunday. In the example shown, watering would occur on Monday, Wednesday and Friday. If you define the days of the week for a program that is used for a zone with a Smart (ET) schedule, then a restriction of the days of the week means that the program logic can no longer freely choose the best day, but is limited to those available and therefore, it may sometimes only be able to water later than would be optimal.
Step 2: Select the zone(s)
Now you have to determine which zones should be executed with the defined program start time on the defined days. Only a single zone or several zones can be selected. You can also optionally select that the program should apply to all zones. Alternatively, a predefined irrigation schedule can also be selected.
In the case shown, the “Drip irrigation” zone is added to the program
Programming the irrigation schedule in standard mode
Add zone
Step 1: Enter basic data
Naming the zone
Selection of which zone output should be used
Selecting a zone symbol
Creation of the zone
Creating a zone in standard mode is limited to naming the zone, selecting an icon, and assigning it to a zone output on the Hunter computer. At this point you cannot choose between different irrigation types; this definition only takes place when the program is created. In standard mode, irrigation duration, irrigation frequency and rules for triggering irrigation are also not defined in the zone, but in the program.
Step 2: Definition of cycle and soak phases and water adjustment
As in the advanced mode, it is also possible in the standard mode to define cycle and soak phases and to define a global adjustment of the irrigation by a certain percentage.
Definition of cycle and soak phases
Definition of a global watering adjustment
Add program
Step 1: Enter program basic data
Naming of the program
Selecting a program type
Entering the basic program data
As in the advanced mode, the time-based irrigation plan and the virtual solar sync are available as program types. The Smart (ET) option is not available in standard mode.
Step 2 – Option 1: Define time-based irrigation plan
These steps must be carried out if the program type “Time-based” was selected when creating the program:
Selection of irrigation days
Definition of program start times
Definition of irrigation days and start times
You can set specific days of the week to water, or you can set watering to occur on odd or even days. The fourth option is to set watering intervals, i.e. watering every x days.
Up to 5 different start times can be saved for the program.
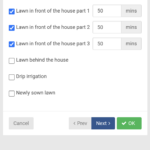
Selection of zones and definition of watering duration
The next step is to select one or more zones that should be processed in the program and define how long irrigation should last for each of these zones. In the example shown below, 3 zones with 50 minutes each are added to the program. With a start time of 5 a.m., the first zone would run for 50 minutes, then the second zone for 50 minutes and finally the third zone for 50 minutes.
Selection of zones and definition of watering times
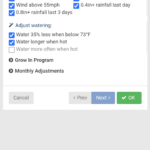
Predictive watering rules
In standard mode, the predictive watering rules are set in the program. The rules available for selection are the same as in advanced mode; an explanation of the individual rules can be found there.
Adjust irrigation based on predictive watering rules
Grow In program
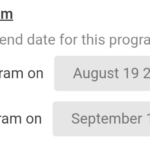
This option is only available in standard mode. Here you have the option of having the irrigation program start and/or end at a specific start or end point in order to allow newly sown lawns to be watered more frequently and more intensively with this program for a while before switching to the standard irrigation program.
Define the start and end times of the growth program
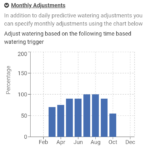
Monthly adjustment
The monthly adjustment allows you to increase or decrease the programmed watering time by a certain percentage for each month of the year.
Enter monthly adjustments
Step 2 – Option 2: Define Virtual Solar Sync Mode
If the “Virtual Solar Sync” irrigation type is selected when creating a program instead of a time-based irrigation plan, the settings work exactly as described previously for option 1, with the only exception that there are slightly fewer predictive watering rules to choose from.
Predictive watering rules possible in Virtual Solar Sync mode
Creation of an irrigation template
In the Zones & Schedules menu in Advanced Mode there is also the option to create irrigation templates, which can then be used when defining new zones. If you let a professional irrigation company manage the irrigation, then they can make their templates available globally to all customers they support.
The following information is stored in the template:
Name of the template
Irrigation Type Used (Time Based Irrigation Schedule, Smart (ET) Schedule, Virtual Solar Sync)
Watering duration
Watering frequency
Predictive watering rules
Monthly adjustment
Naming the schedule and selecting the watering type
Determination of watering duration, frequency, predictive watering rules and monthly adjustment
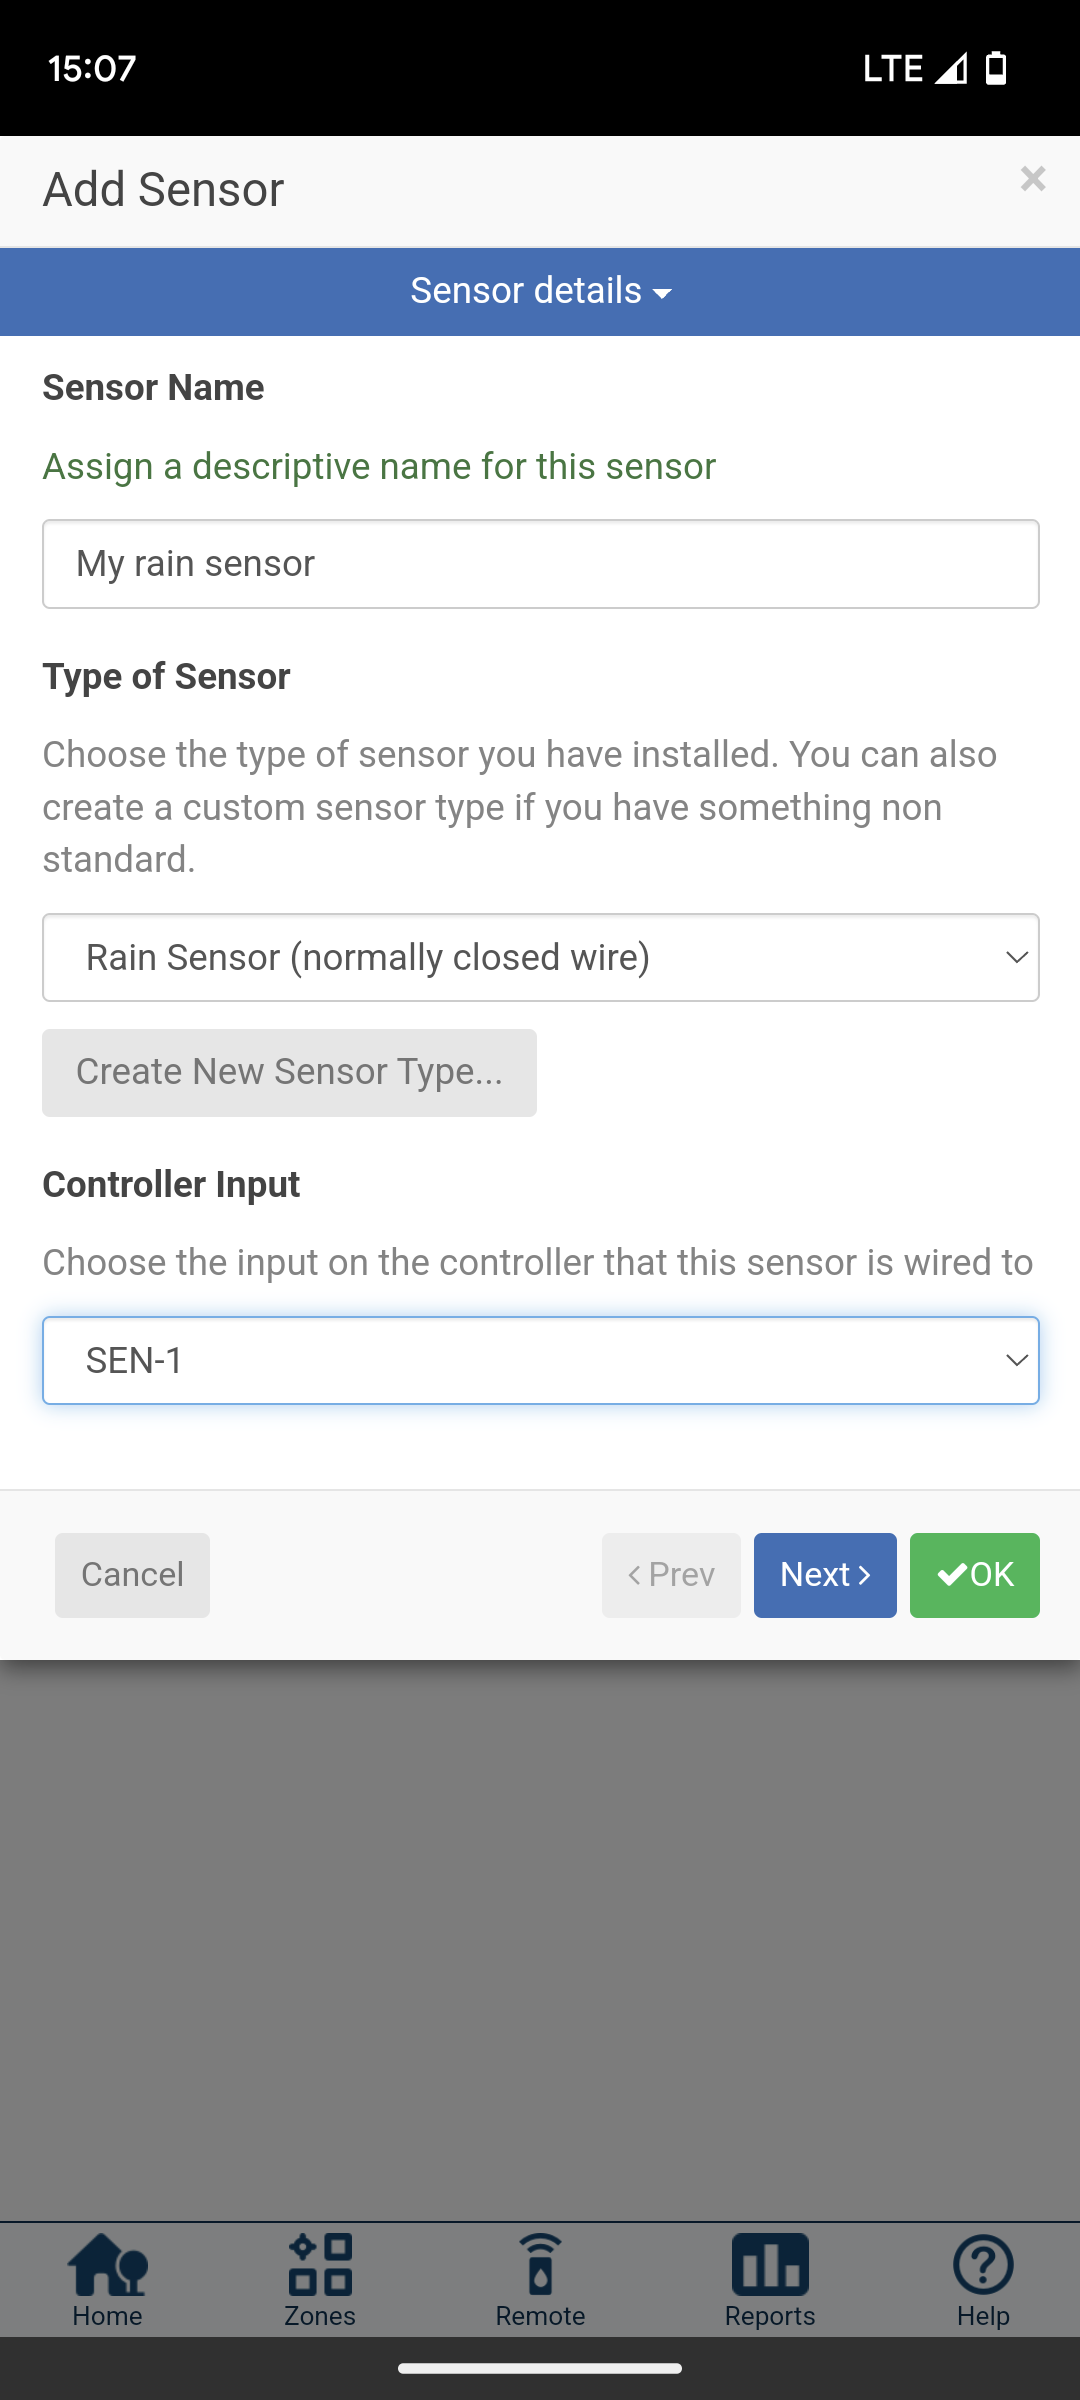
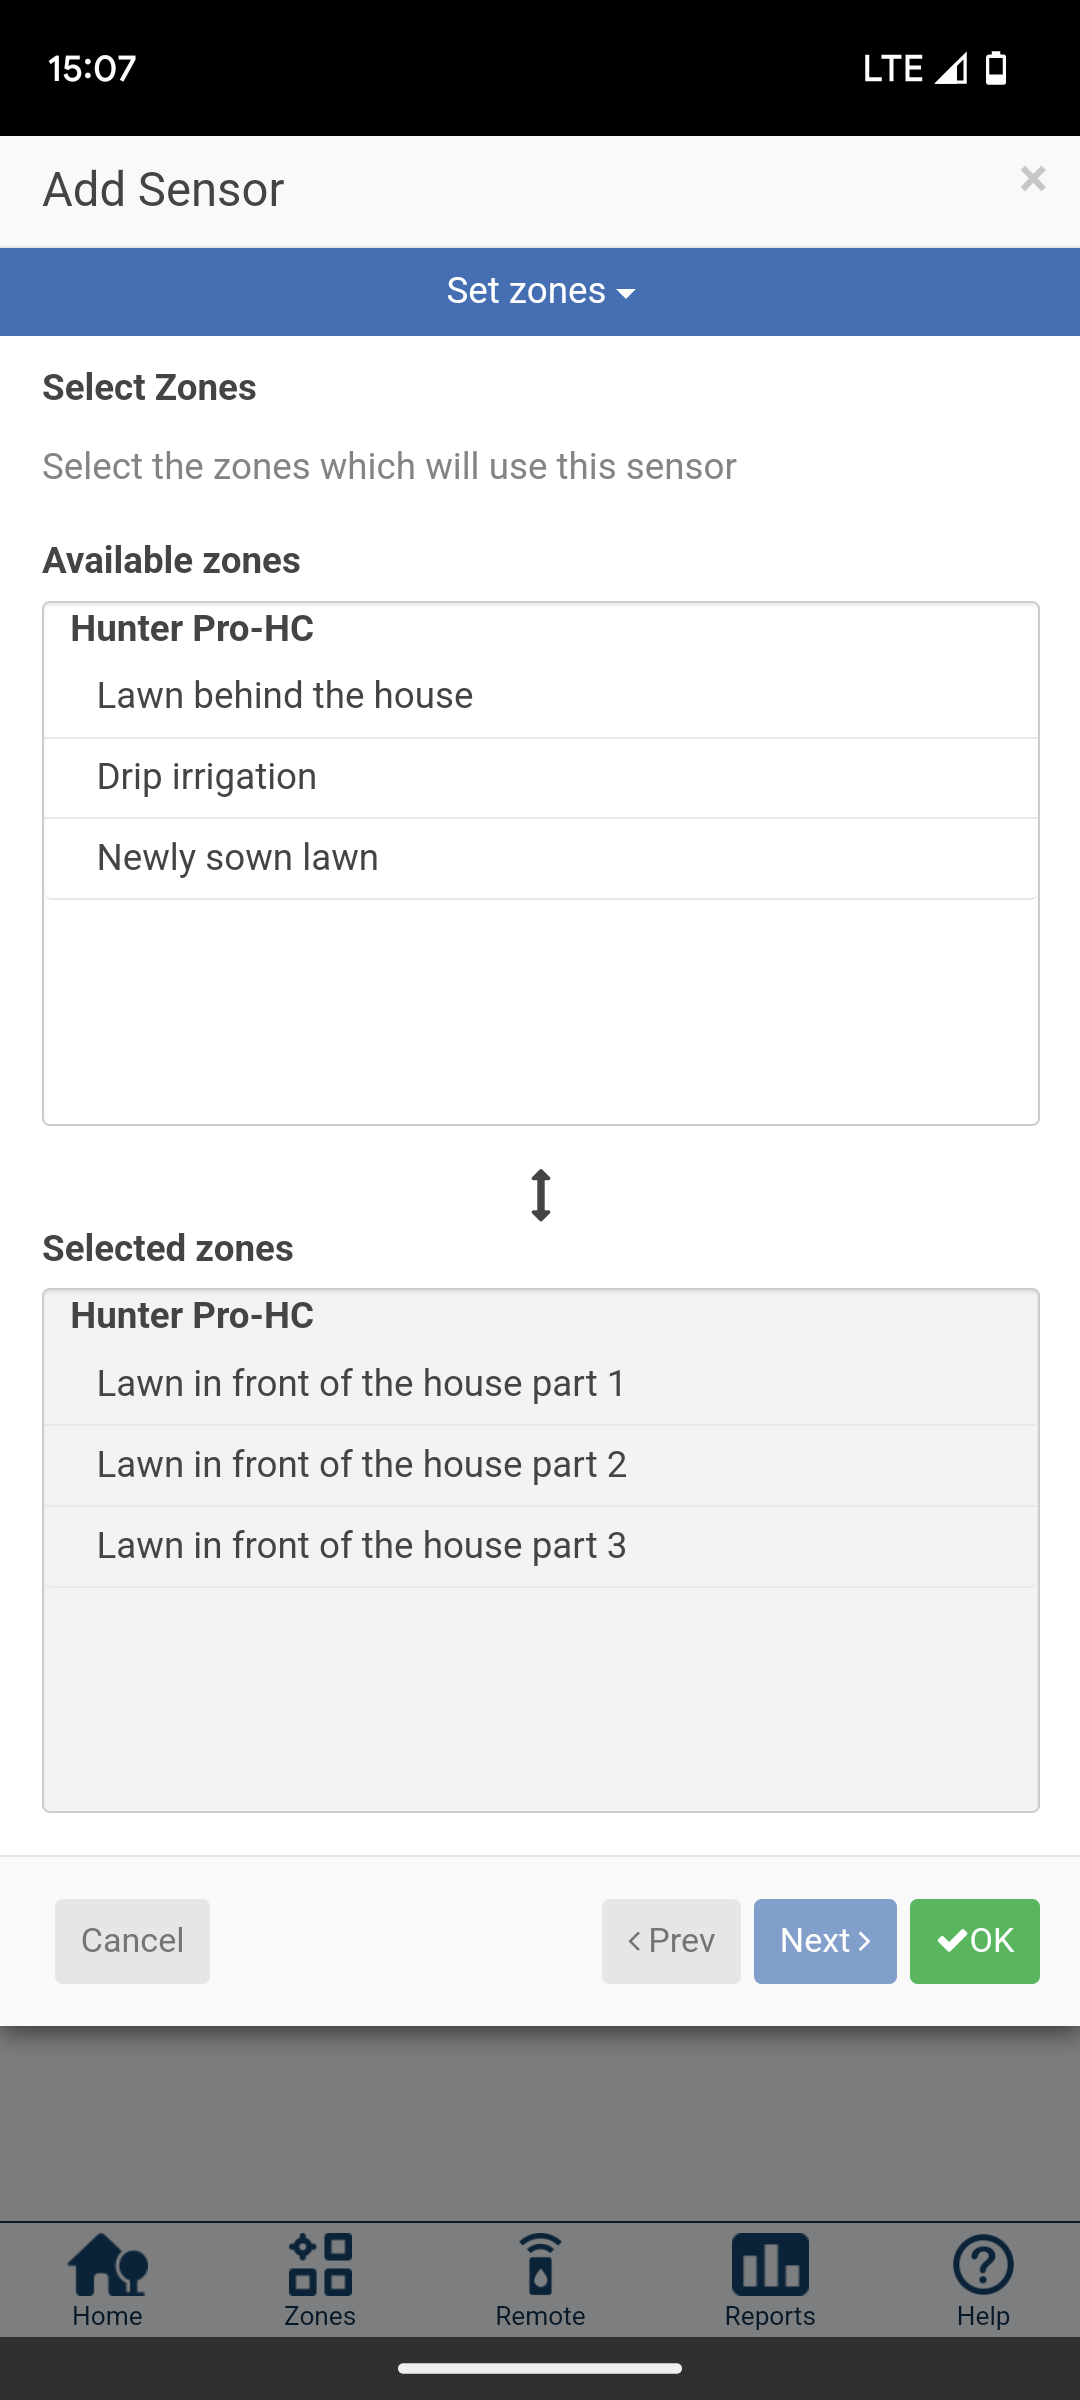
Add sensor
Hydrawise offers very extensive options for working with sensors. There are two sensor inputs available on the irrigation computer, to which a rain sensor, soil moisture sensor or flow meter can be connected as standard. Which sensor can be connected to which input is not fixed, but is simply defined when the sensor is added. When connecting a rain or soil moisture sensor, you can also choose whether they work according to the “normally open” principle or the “normally closed” principle. This is very positive, as in principle the entire range of sensors available on the market is available for use. When it comes to flow meters, you can also choose from a number of different models. For the added sensor it can be defined for which of the zones it should work.
Selection of the sensor type and the input to which it is connected
Selection of zones
Does it make sense to use a sensor?
Using a flow meter gives you the ability to monitor the system for proper water usage and quickly detect problems. But why do you need a rain sensor or soil moisture sensor with a Hydrawise computer? In principle, this function should already be covered by obtaining the weather data via the web?
In my opinion, using a soil moisture sensor usually doesn’t make sense unless you want your system to be extremely precise so that you don’t want to rely on the extrapolated Hydrawise values. The extrapolated values are created once at the beginning of the day based on the weather forecast valid at that time. If the weather then behaves differently than predicted, for example if there is a short, intense downpour that was not predicted, then irrigation may occur even though the soil moisture values would speak against it. This won’t happen too often over the course of a year and won’t make too much of a difference, but if you want to avoid it at all costs, then using a soil moisture sensor can make sense. Alternatively, this inaccuracy could also be reduced with the paid upgrade to the Hydrawise Enthusiast plan, which entitles you to update the weather data more frequently (more on this in the section “Change account settings”)
The same argument applies to the rain sensor and there is another one here: an additional rain sensor also makes sense if it is important to you to 100% rule out watering when it starts to rain. So if irrigation that has already started should stop immediately when rain falls. For example, to avoid strange looks from neighbors who make fun of watering when it rains at the same time.
If you don’t find the desired flow meter among the selectable flow meters, or if you want to use a completely different sensor type, you can create a new one in Hydrawise.
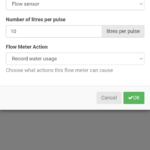
Adding a flow sensor
When installing a flow meter, the liter per pulse value of the flow meter must be stored. Communication with the flow meter does not work in such a way that the liter output flowing through is transmitted as a numerical value, but rather, like rain and soil moisture sensors, the sensor only sends electrical pulses to the irrigation computer. The liter per pulse value indicates after how many liters have passed through the sensor sends an electronic pulse to the irrigation computer. For example, if the sensor sends one pulse per 10 liters and it has sent 6 pulses, then the irrigation computer knows that 60 liters have flowed through. The smaller the liter value per pulse, the more precise measurements are possible.
Installation of a customer-specific flow meter
Adding an alternative sensor type
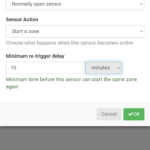
If you want to use a sensor other than a rain sensor, soil moisture sensor or flow sensor in Hydrawise, you can create a new one in the system. In the following screenshot I have shown an example of a motion sensor that should start watering when a motion is detected. When you create your own sensor, normally open and normally closed sensors are possible. And these can either start or turn off the zone. In addition, a specific minute value can be stored within which the sensor is prevented from being triggered again.
Installation of a new type of sensor
Add alerts
Under the menu item Account – Alerts you can define events about which you would like to be actively notified.
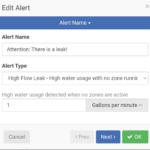
It is currently possible to create the following 4 alerts:
Notification if the control unit has not had an internet connection for x days
Notification when there is a high current flow in the solenoid coil of a zone (short circuit to the solenoid)
Notification when there is low current flow in the solenoid coil of a zone (defective cable on the solenoid coil)
Notification when a watering run has been skipped
With an additional flow meter, the following 4 notifications can also be created:
Notification when a zone’s water consumption is x% higher than the last run
Notification when a zone’s water consumption is x% lower than the last run
Notification if more than x liters of water have been used in the last minute even though no zone was active
Notification if more than x liters of water were used within the last hour even though no zone was active
And if you have a rain sensor, the following notification can also be created:
Notification when rain sensor status changes
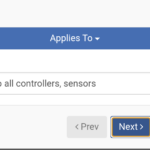
When creating an alert, you can choose whether it should apply to all control devices stored in Hydrawise or only to certain ones. If an alert occurs, it will always be added to the event log in the app’s Account – Events menu. In addition, you can also have the warning actively displayed as a push notification on your cell phone, which I would definitely recommend because it could easily be overlooked in the menu since you don’t normally check it regularly. If you have upgraded to the paid Enthusiast plan, you can also have the warning sent to you as an SMS.
Selection of the alert type and determination of the limit value
Determination which control device(s) the alert should apply to
Select how you would like to receive the warning message
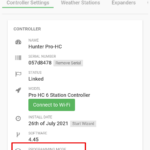
Change Controller Settings
In the controller settings menu, various basic settings of the irrigation computer can be changed. As already described above, this includes the possibility of changing the program mode from standard operation to advanced operation or vice versa. Apart from that, the following settings can also be made here:
The name of the control device can be changed
You can decide what the irrigation computer should do when it does not have an internet connection. By default, it continues to use the most recently transmitted watering times; alternatively, you can select that no watering takes place in such a case.
The time zone used for the settings can be changed
Valve delays can be stored. The master valve delay determines the minimum number of seconds that should pass after the master valve opens before a zone valve is opened. The inter-zone delay determines how many seconds should elapse after a zone closes before the next zone’s valve opens. In certain setups, these settings can help you build the necessary water pressure for irrigation before opening the zones.
Possible controller settings
In the Weather Stations tab you can specifically select from which weather stations the weather data is obtained. However, this is very limited by default (selection only from airport weather stations and limited to one station); only with a paid upgrade to an Enthusiast plan can you choose from up to 5 private weather stations. And then it would also be possible to select a weather station that you operate yourself.
In the Expanders tab, the use of additional hardware modules for additional sector outputs can be stored so that more zones can then be supplied.
In the Offline Adjustments tab, monthly adjustments can be stored that would be applied if the irrigation computer was not connected to the Internet for a long period of time.
Change Account Settings
In the Account menu item, a few interesting settings relating to the Hydrawise account can be made. The possibility of creating warning messages has already been described above. In addition, you can view warning messages that have occurred in the Events submenu and, under the event type “Info”, you can see a history of the changes made in the system and irrigation runs that have taken place.
In the Messages submenu you have the option of contacting a Hydrawise authorized contractor near your home directly. To do this, authorized dealers within a 20 mile radius are suggested and their contact details are displayed. You can now contact them by phone or email or directly using the chat function integrated into Hydrawise.
In the Account Details submenu you can change the language and the units of measurement used in the program, as well as change the email address. If you want, you can also upload a photo of yourself or your garden.
If you want to upgrade your Hydrawise account to the Enthusiast plan, you can do so here too. This currently costs 66 USD per year and can be paid directly via the app with Paypal. You can then select several weather stations from a larger pool of stations for predictive watering and it is also possible to integrate your own weather station. The watering times are updated not just once a day, but 1 hour before each program starts and you can add up to 5 instead of up to 3 control devices to your Hydrawise account. In addition, the report history is longer at 365 days and you have more image storage at 100 megabytes. Warning messages can also be sent via SMS.
Hydrawise Enthusiast Plan
In the My Controllers submenu it is possible to add up to two additional irrigation computers to the account or to remove an existing control device and replace it with another one.
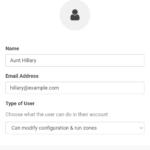
In the Users submenu you can see which users currently have access to the Hydrawise account and you can create access for additional users. They can then also access the Hydrawise account via the Hydrawise app on their cell phone or on their desktop computer via the web browser at https://app.hydrawise.com/config/dashboard.
To do this, simply enter the user’s name and email address and determine which of the two possible authorization levels he should have:
Can modify configurations and run zones
Can view configurations and run zones manually
The first level should be reserved for users who are more familiar with the system and are able to make adjustments. The second level is good for users who only want to use the system but do not want to change any settings. If you give such users this permission level, you avoid the risk of something being accidentally changed. If you work with a professional operator, you may only receive limited authorization for daily use and the operator, as an admin, will make changes to the configuration.
Adding a new user
Finally, electronic files can be stored and accessed under My Files. This could be an issue if the system is operated by a professional who provides the user with instructions for daily use. If you operate the system yourself, I can’t think of any useful application.
Menu item Home (Home Page)
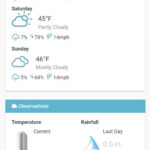
The Home page is the start page of the Hydrawise system, where you can see an overview of essential information.
Created irrigation runs (click on a run to get detailed information about it)
Weather forecast for the next 3 days
Observations on temperature and precipitation
Information about sensors used
Information about the control unit
This information can be seen on the home page
By clicking on one of the zone symbols it is also possible to quickly start a manual watering run. After selecting the zone, all you have to do is enter the desired running time and start irrigation.
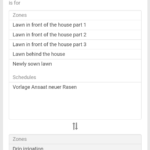
Menu item Zones and Programs
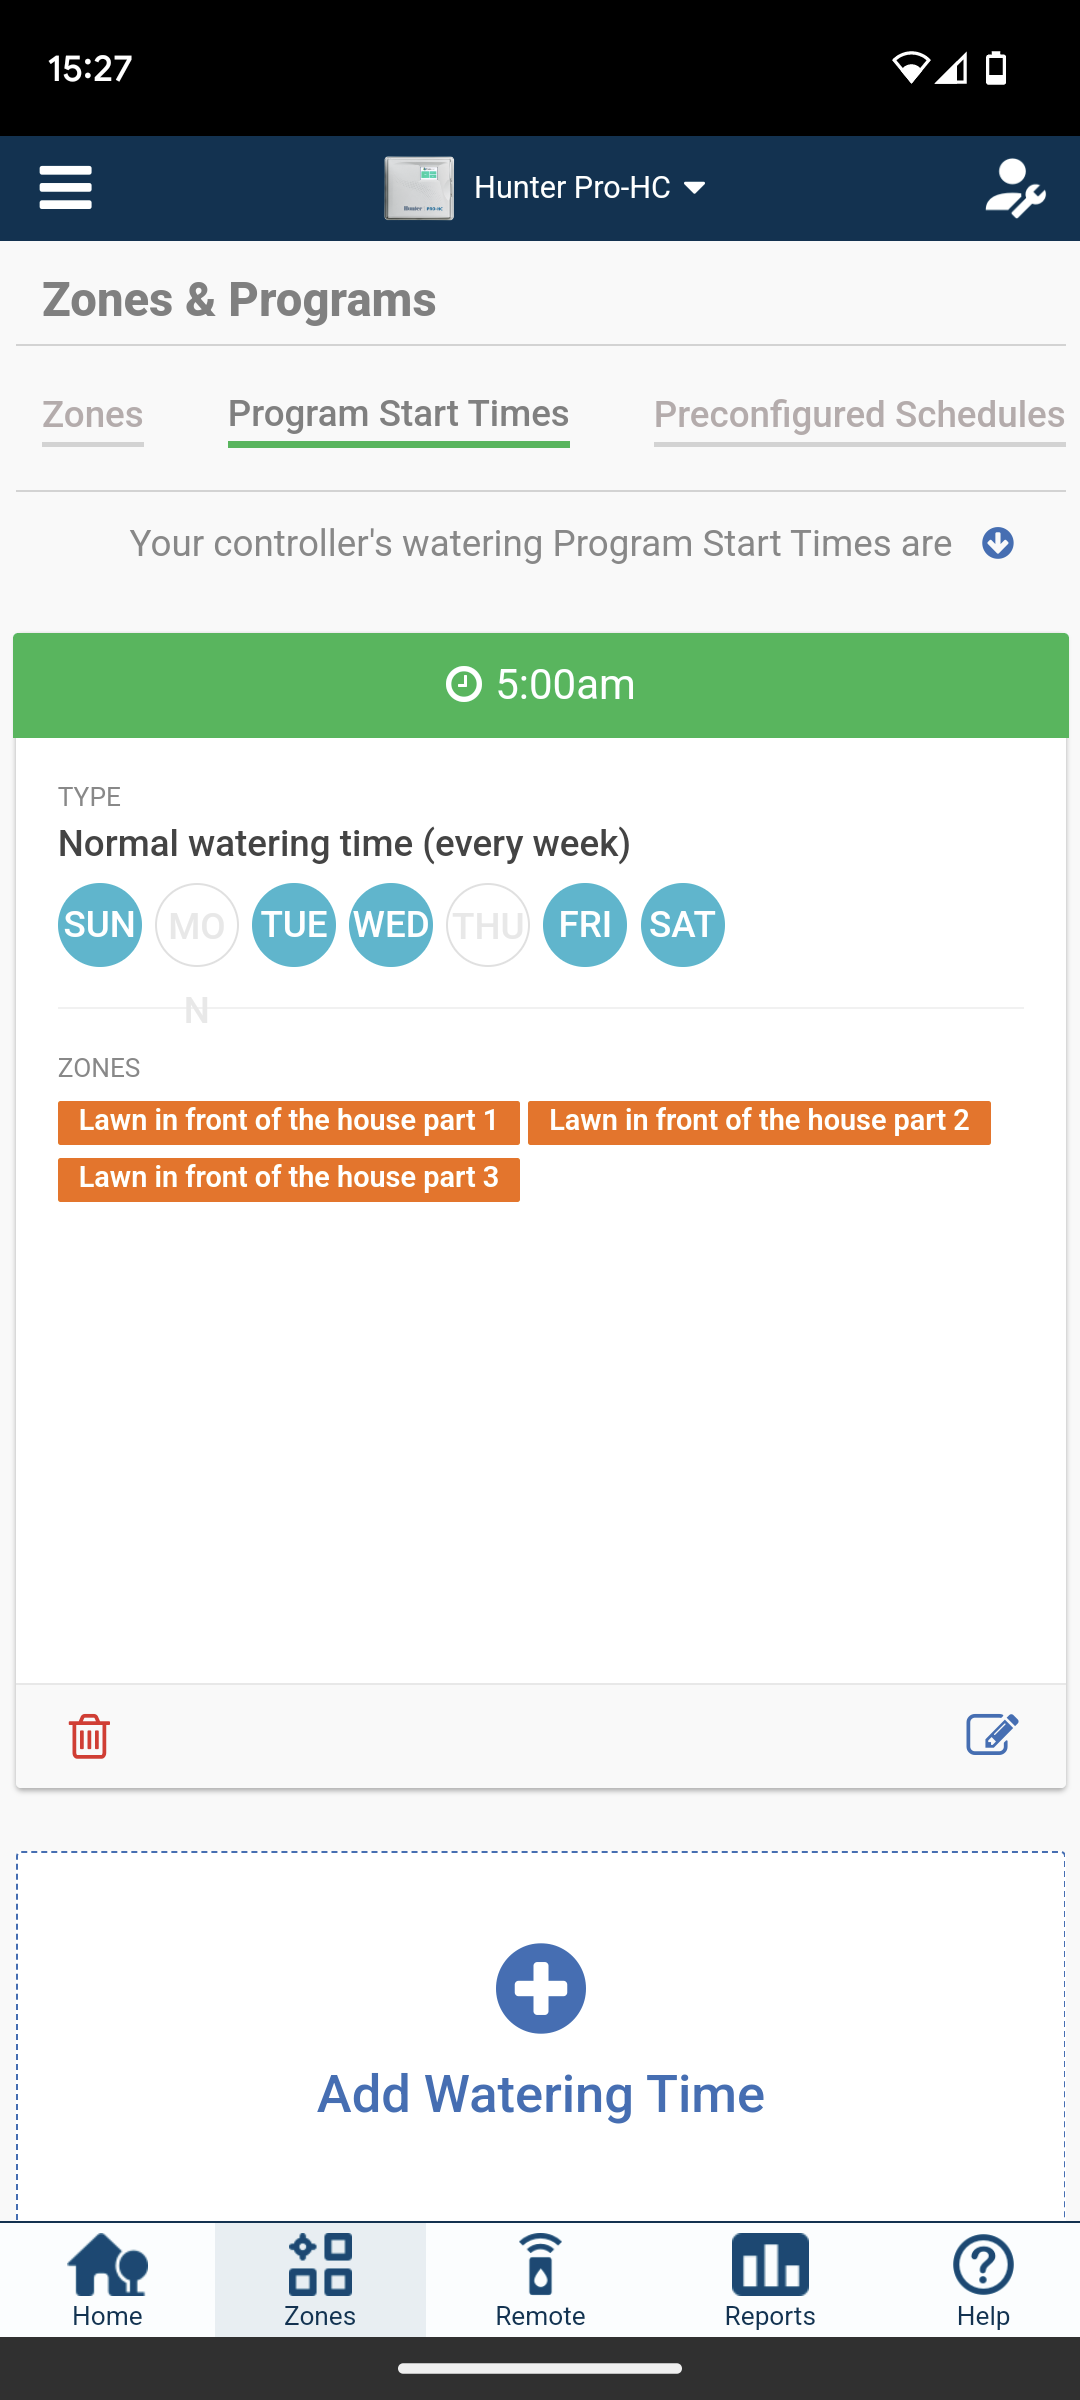
The zones and programs created are displayed under the menu item Zones & Programs. You can change the settings by clicking on the edit symbol. You can also set here whether a master valve is used for irrigation. Such a master valve is automatically opened when each zone valve is opened. It is installed directly after the water connection and serves as a safety net should the zone valve not close properly. Alternatively, it can also be used to start a pump.
Example of created zones (in advanced mode)
Example of a stored program (in advanced mode)
Menu item Reports
A range of information can be found in the Reports menu item:
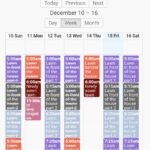
The irrigation runs planned for the next 30 days are displayed in calendar form. The planning is always based on the current weather forecast, so it can change again the next time the weather data is updated. You can also look up which irrigation runs took place in the previous days.
A detailed weather forecast is available for the next few days
The values measured by the weather station can be accessed in detail (wind, precipitation, temperature). The calculated evaporation can also be tracked.
Comprehensive water consumption statistics (if an additional flow sensor is present)
Historical weather data
Example of an overview of planned irrigation runs
Bluetooth control
The Bluetooth control menu item offers an alternative to controlling the irrigation computer via cell phone if Wi-Fi is not available. To do this, you must be in close proximity to the watering computer (maximum approx. 70 feet away).
Purchase a Hydrawise irrigation computer
In my experience, particularly the the Hunter HC and the Hunter Pro-HC are suitable for the usual private user, although I myself tend towards the Pro-HC, which is a little more expensive but has better manufacturing quality and is also offered as an outdoor model. Another alternative would be to use a traditional Hunter X2 irrigation computer of the latest generation and make it web-enabled with an additional Hunter Wand WiFi module.
Hunter Pro-HC on Amazon:
Auto Amazon Links: No products found.
Hunter HC and Hunter X2 with Wand on Amazon:
Auto Amazon Links: No products found.
Conclusion and Recommendation
The article has become very long and there is a good reason for this: Hydrawise’s setting options are actually very sophisticated and extensive. I can hardly think of a scenario that couldn’t be covered with this. The product created by the then Australian startup company Hydrawise was absolutely revolutionary at the time and was cleverly further improved by Hunter technicians after the company was taken over, so that it is now a mature product that works well in practice. By intelligently using the weather data available online, you can actually save a lot of water when watering, thereby protecting both the environment and your own wallet. The comparatively high purchase price is somewhat put into perspective when you consider that in return you save yourself having to purchase additional sensors. Also unlike some other systems, you don’t need an additional gateway to connect to the web.
With the abundance of setting options and small wheels that you can turn in the Hydrawise system, some people may be afraid that they will be completely overwhelmed by the software. In my opinion that is not the case! The software is cleverly structured in layers so that the essential things can be set very easily and with the support of a setup assistant. Only for further optimizations you have to go deeper into the system. If you want to squeeze every last percent out of the system in order to use as little water as possible and irrigate as efficiently as possible, then it is best to gradually approach the optimal setting. So make a small change, try it out for a few weeks to see what effect it has, evaluate whether it has had a positive effect and then think about the next change step. This only requires minimal effort and little by little you will find your perfect setting.
In my opinion, you can usually get by with the free basic version of the software, so an update to the paid Enthusiast plan is not necessary in order to have a suitable product; you can also use the software in the basic version . An update may make sense if you have a large area to irrigate and want to maximize water savings with even more current weather data and measurements from your own weather station.
In my opinion, Hydrawise is the best smart irrigation system currently available on the market. And it is very likely that it will remain in that position for the next years, because developing such complex software requires thousands and thousands of developer hours, so this technological advantage can only be made up with an immense amount of money. Every user automatically benefits from further improvements to the Hydrawise software, as the software is always updated to the latest version.
I am an enthusiastic do-it-yourselfer and have been running this blog on the subject of garden irrigation for more than 6 years now. In over 150 specialist articles, I share my own experiences and know-how from years of research and numerous product tests. -> More about me


")


