Following is a collection of mistakes that often happen when installing irrigation systems. Practically a collection of the “classics” among the bugs.
1. Plan no overlapping of the throwing circles
This is incorrectly implemented even in some online planning tools and is the absolute number 1 on the best list of errors when implementing garden irrigation. This probably stems from the days when irrigation was exclusively carried out with impulse sprinklers, which also ensured sufficient irrigation in the vicinity of the sprinkler . With today’s generation of sprinklers, it’s absolutely imperative to plan the throwing circles of the sprinklers so that they reach the next sprinkler, and not just far enough to reach the next throwing circle. This is the only way to ensure that the area directly around the sprinkler is sufficiently watered and that watering is even.

Left right, right wrong
In the absolutely correct expansion stage, not only do the sprinklers on the left and right reach each other, but the throwing circle of the sprinkler on the opposite side also reaches its counterpart. It then looks like this:
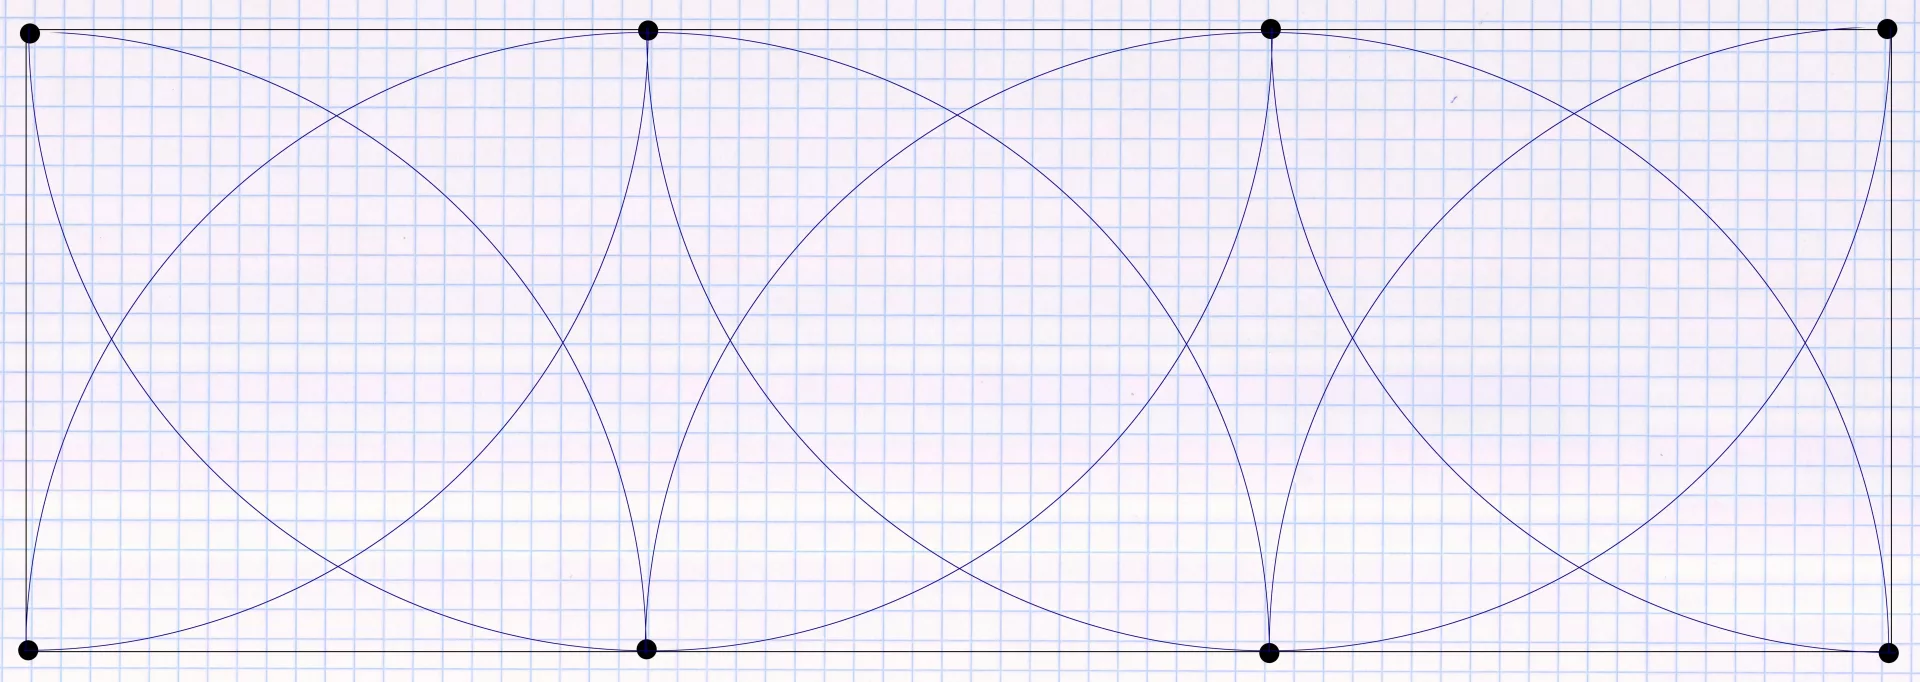
Example of a positioning in the square pattern
More information on the correct positioning of sprinklers: Planning – Place sprinklers correctly
2. First order material and then think about the planning
With a lot of luck, this can also work, but normally it is more of a flop. The sprinklers to be used, the pipeline, the necessary connectors, the right irrigation computer, etc. depend on the planning. And vice versa, it must be determined in the planning which type of sprinkler you want to use and plan with this performance data. It also makes a huge difference whether you implement everything with lawn irrigation or, for example, part of the garden irrigation with drip irrigation.
If you choose the wrong order, you miss the chance of the most intelligent implementation possible and you are guaranteed to have ordered too many or too few things or bought components that are not suitable for the required purpose. Therefore, first plan properly and then take action with the finished plan!
3. Incorrect calculation of water pressure and available water volume
In order to be able to plan the irrigation system correctly, it is necessary to know how much water is available. And not directly at the water connection, because that is the amount of water that would only be available if the water did not have to exert any pressure on the pipeline. However, since the sprinklers require a certain pressure to act on them, and this pressure has a negative effect on the flow rate, significantly less water flows through the pipeline. For example, if you plan the irrigation system with a pressure of 40 psi, which act on the sprinklers, then you have to calculate with a smaller amount of water than if you would calculate with 30 psi. This relationship can be represented as follows:
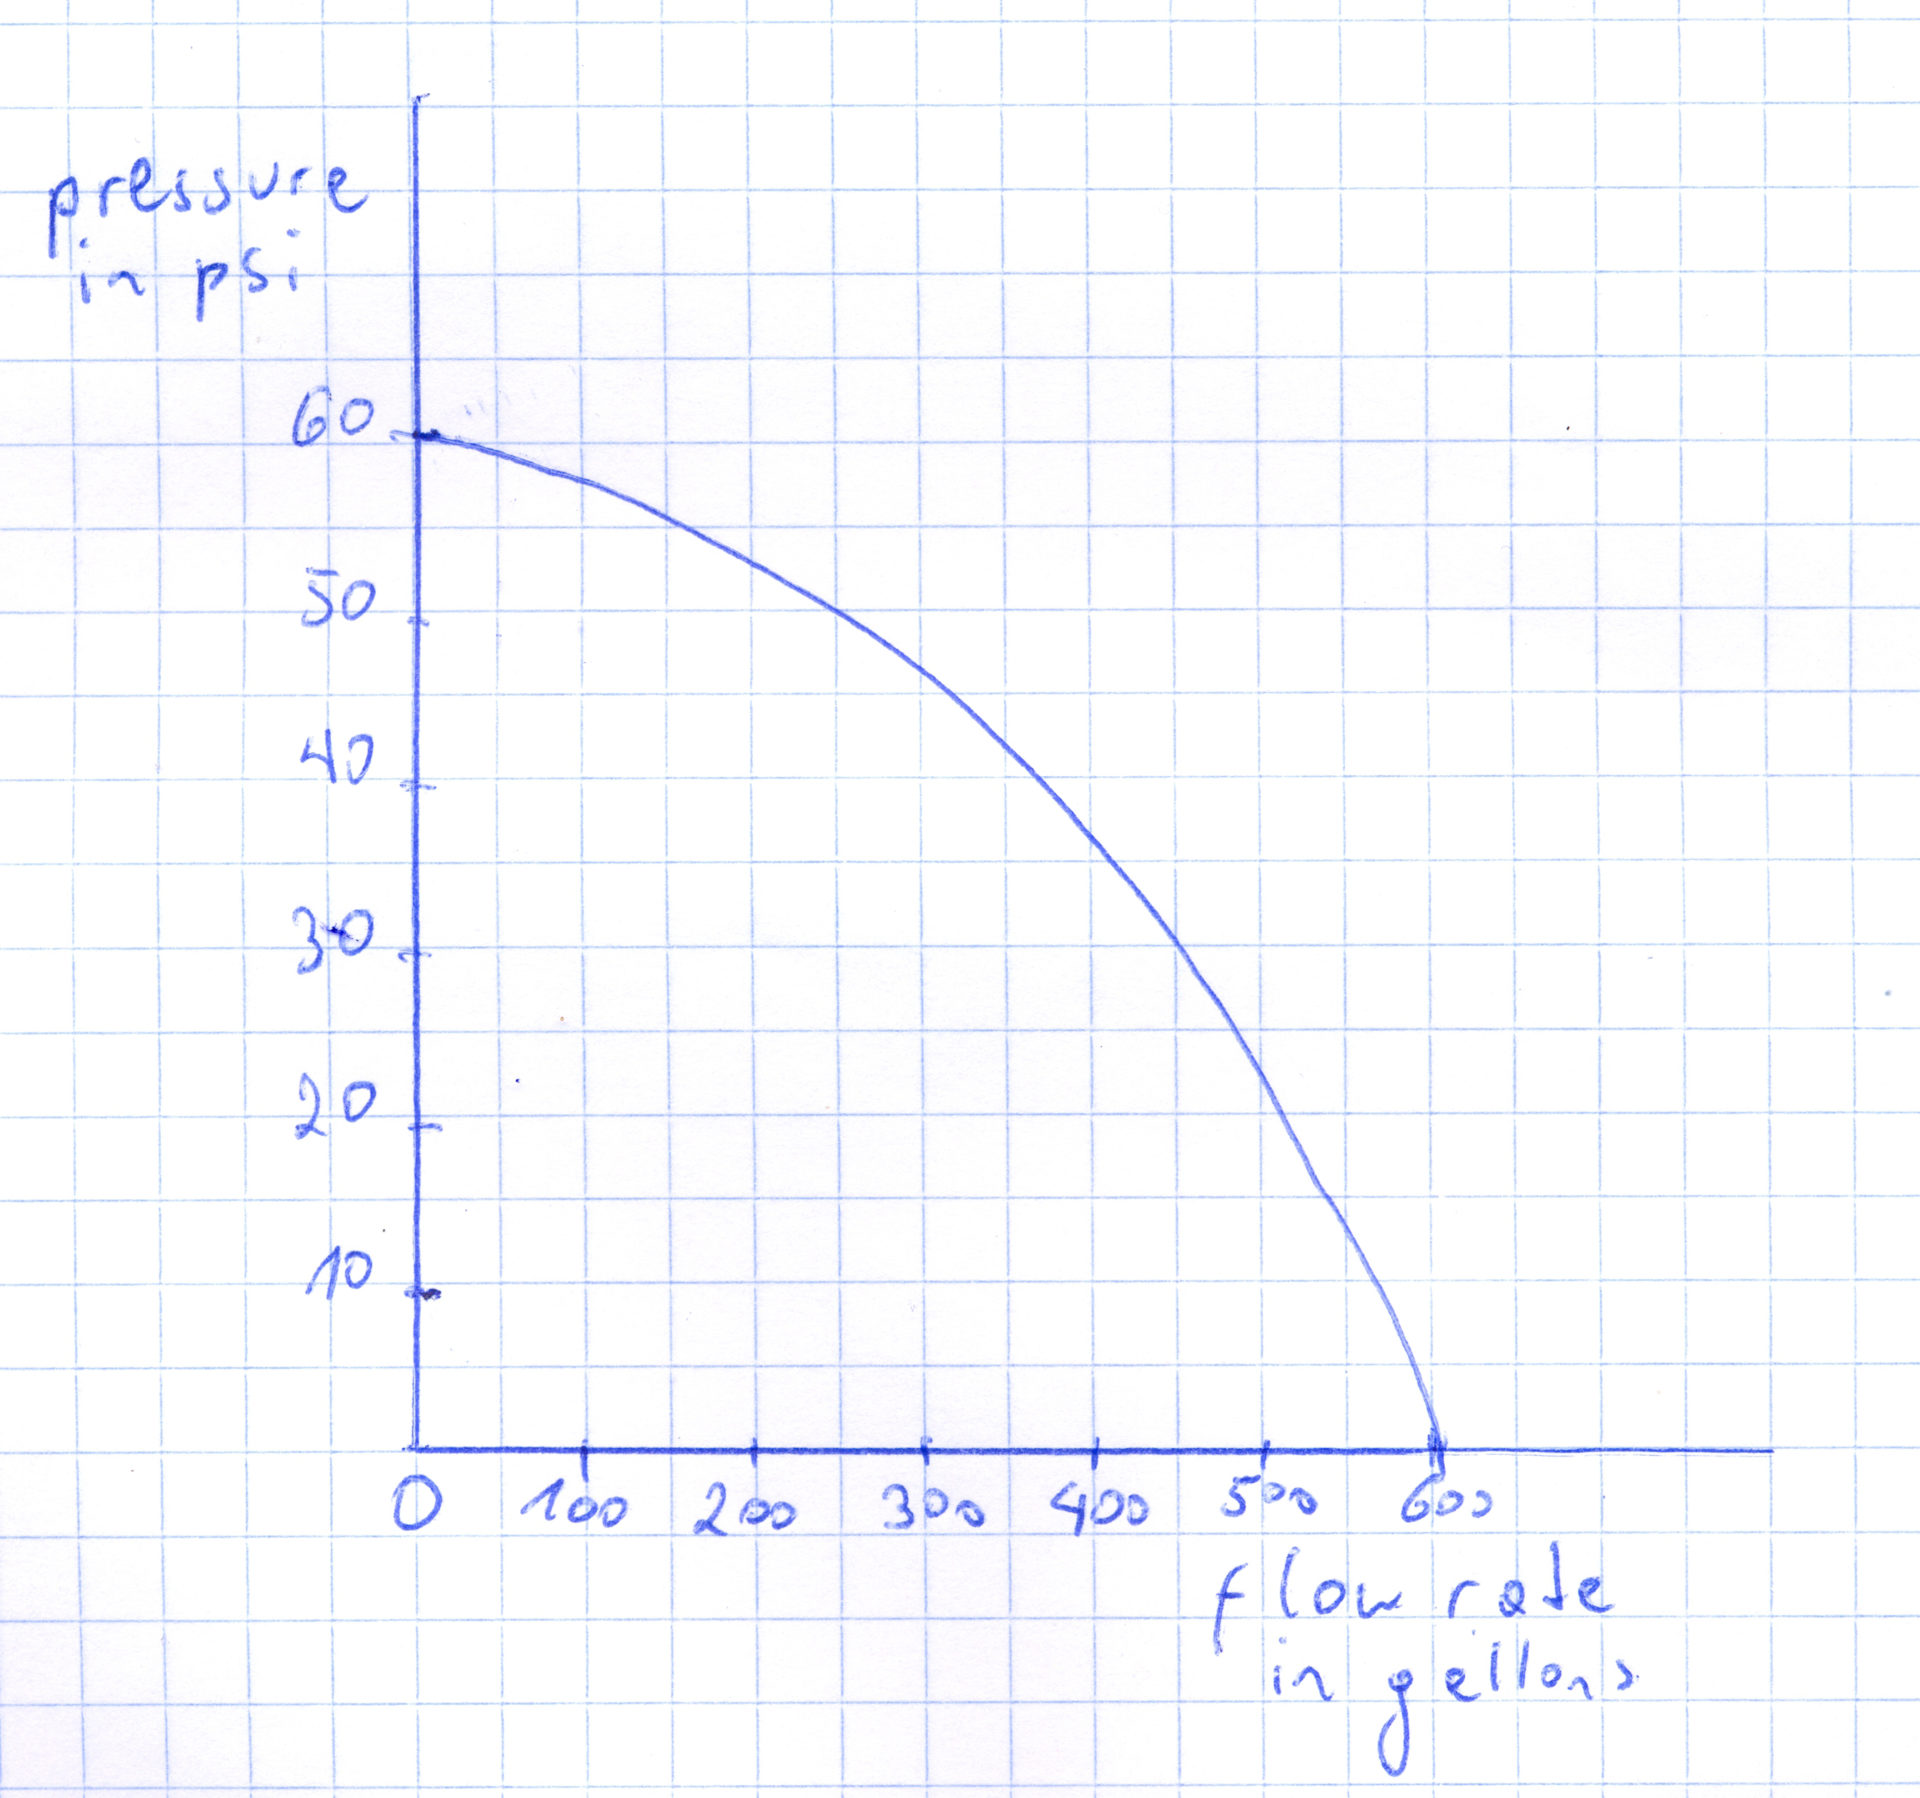
The higher the pressure required to act on the sprinklers, the smaller the amount of water that will flow through the pipeline
The easiest way to determine the amount of water available at a certain water pressure is to use your own water pressure and flow test gauge.
4. Plan sprinkler throw too optimistically
The sprinkler throw distances according to the manufacturer’s specifications are throw distances that are achieved under optimal laboratory conditions. These cannot be reached in normal operation, it already leads to deviations when the wind blows a little bit. Therefore, according to the manufacturer’s information, the throw distances should be reduced by 10% in the planning to be on the safe side. Slightly reducing a throw distance that is too large with the adjustment screw is not a problem; vice versa, increasing it is not possible.
5. Not inserting the pipeline pipe far enough into the connector
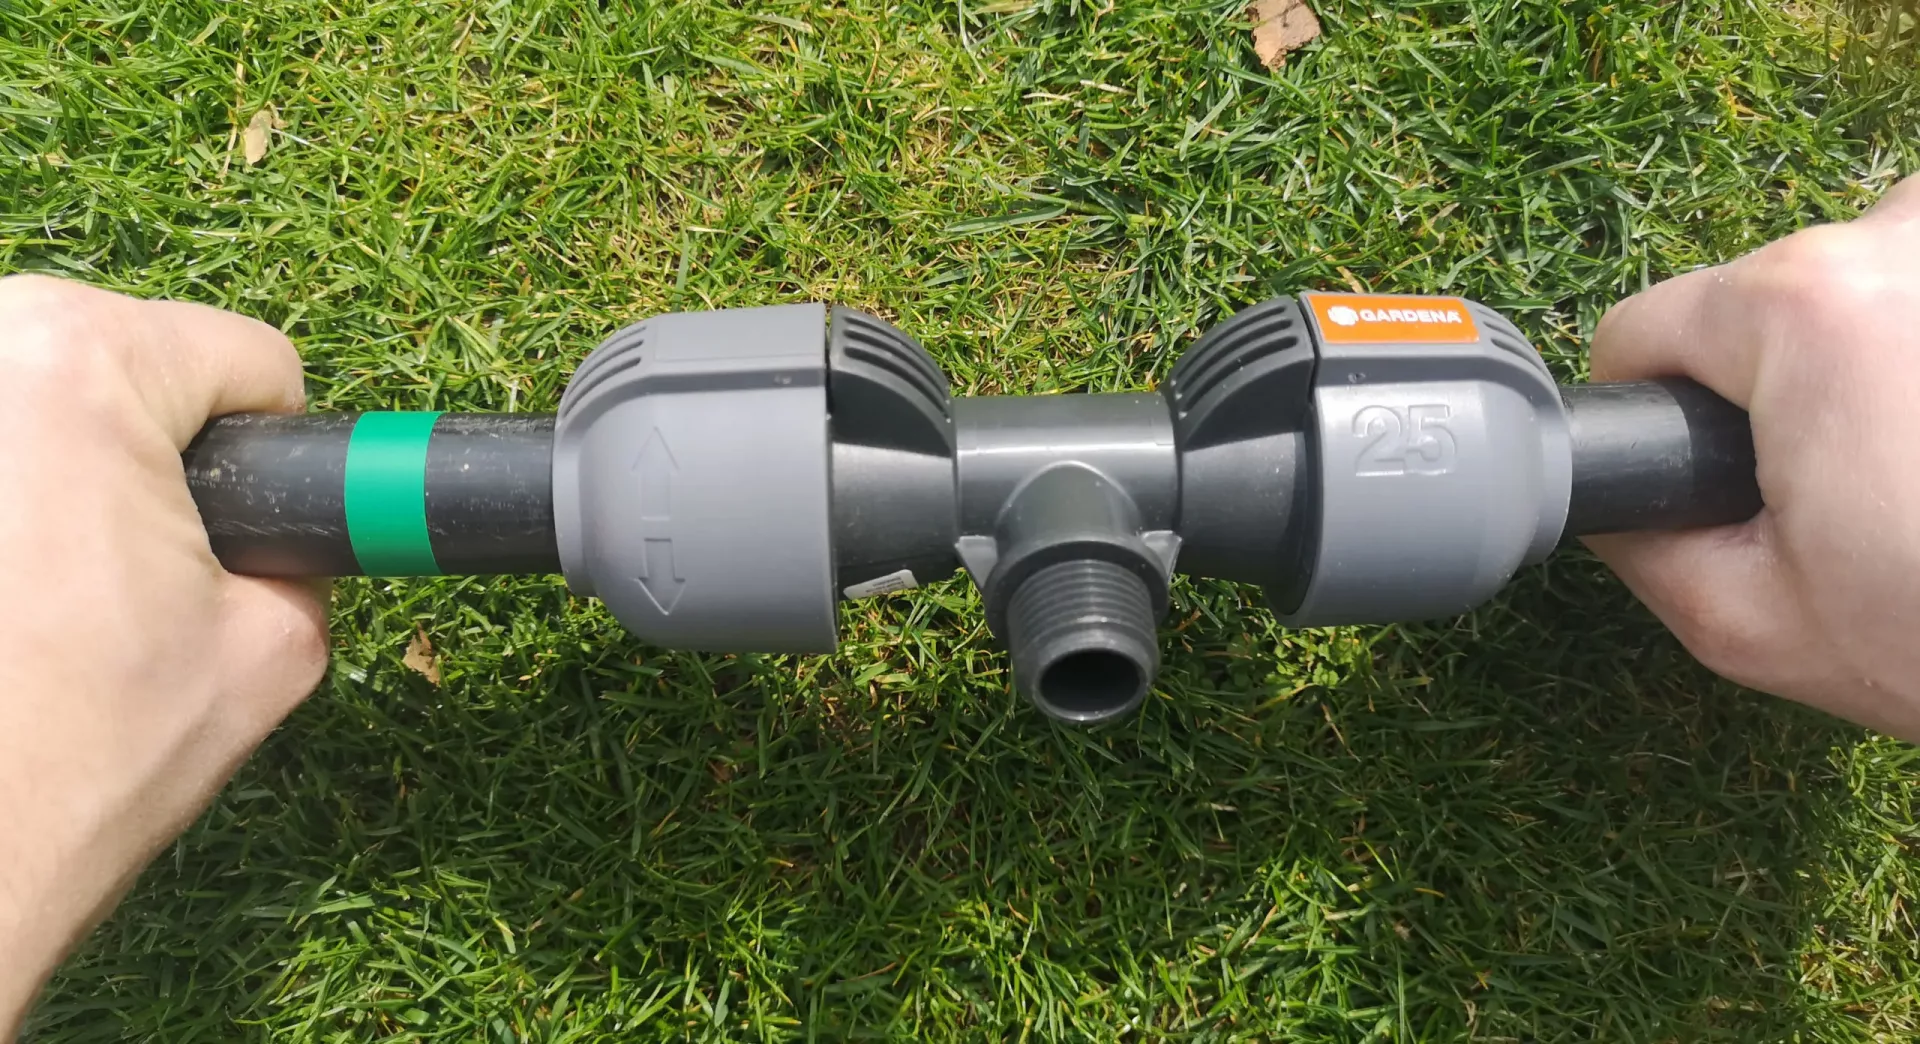
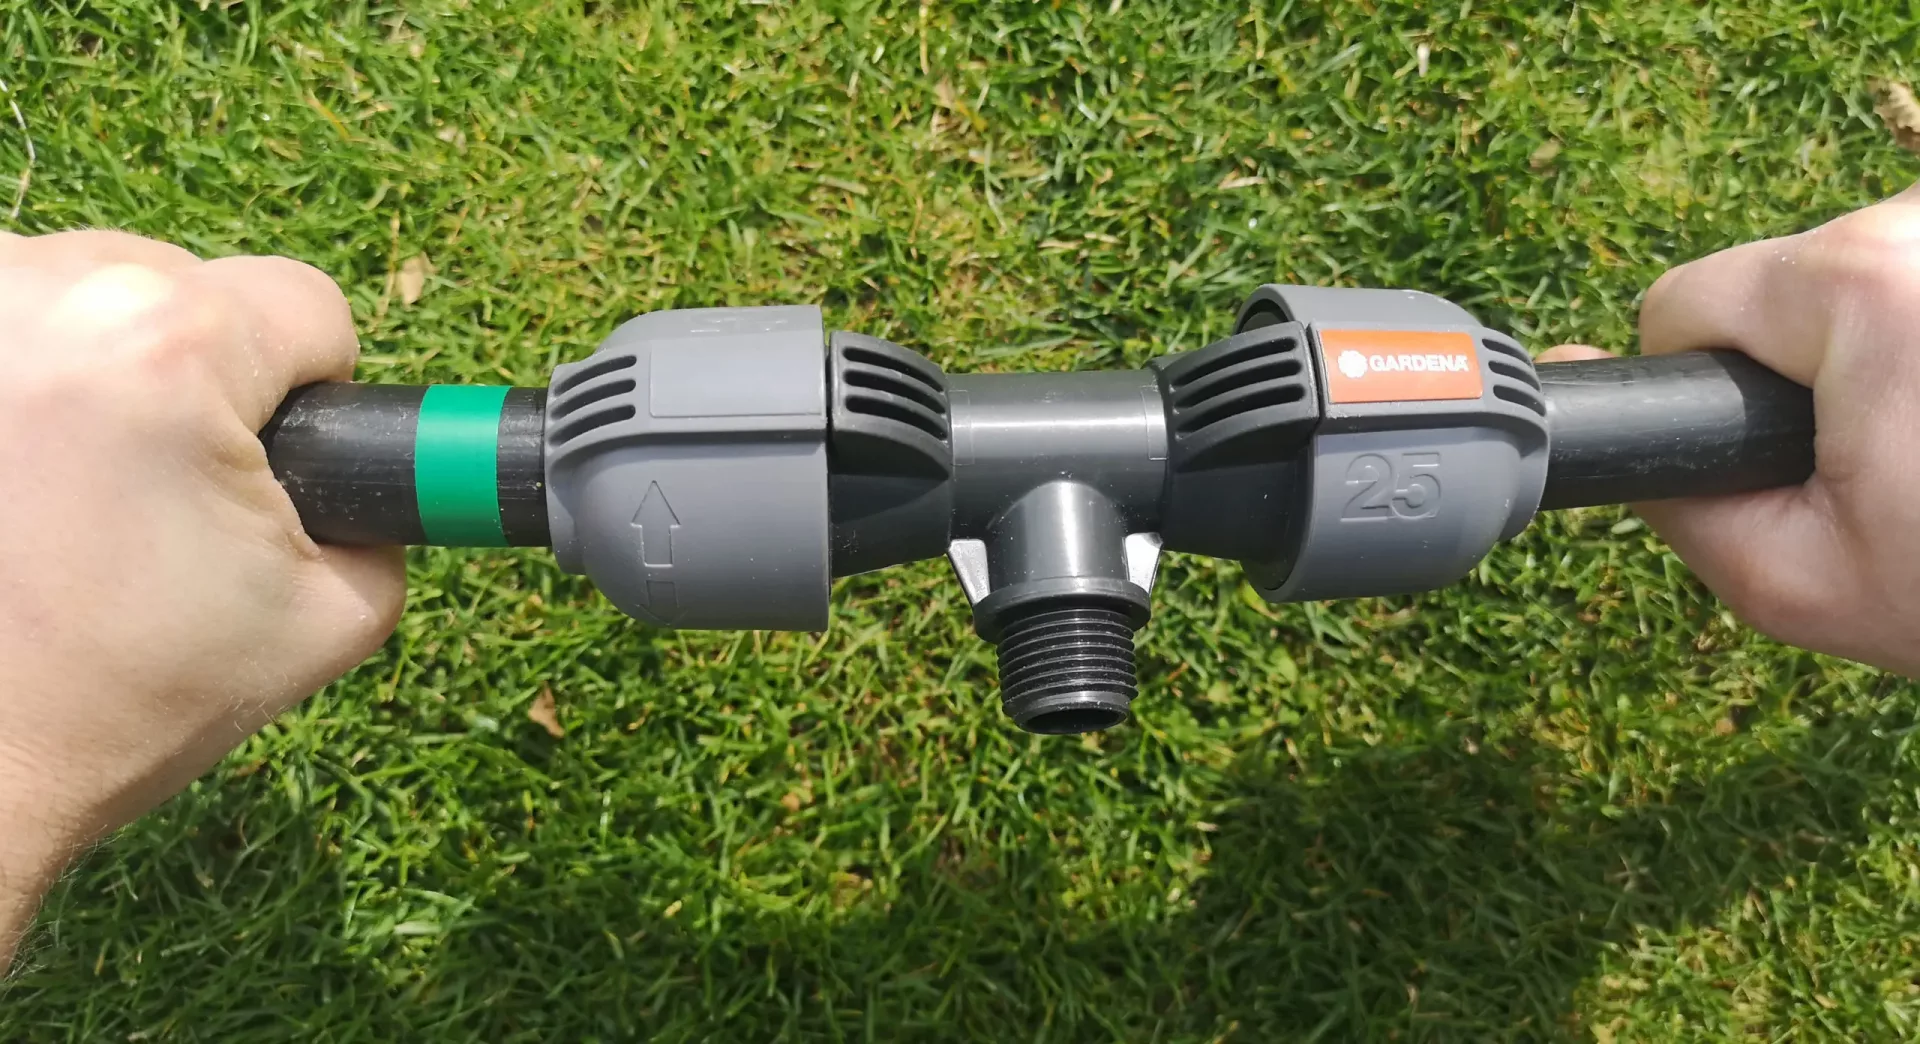
This is much easier to do than you think, especially if you are not familiar with irrigation systems. The pipeline pipes are held in the connectors and fittings with clamps. When the tube is pushed into the connector, the tube slips in very easily the first piece and you encounter resistance. This is the narrowing caused by the clamp integrated in the connector, which starts at this point. The tube must now be pushed a little further into the clamp with a little effort until it is really in place and cannot be pushed any further. If you don’t do that, at first glance it seems to hold up, but the connector is then leaking and water flows out.
Following is a pictorial representation of the problem. In the first picture, the tube is not yet completely in the connector, in the second it is pushed in as far as it will go (observe the green mark on the tube):
6. Plan the number of sectors too small
There is actually no reason for this in practice, because the number of sectors does not have a great impact on the total costs of a garden irrigation system. Basically, the additional costs for each additional sector are only reflected in the costs for each additional pipeline pipe string. If you work with solenoid valves, then an additional solenoid valve is also required. According to my rough calculation for the irrigation costs, this means about 30 cents per additional foot of pipe and about 20 USD per additional solenoid valve.
So no reason to be afraid of additional sectors and to plan too tightly! On the contrary: if a sector is almost running out of available water, it is better to plan an additional sector to be on the safe side. Because, firstly, you are never immune to the possibility that the available water volume will fluctuate slightly in the future, e.g. due to the declining performance of a pump, and secondly, you have reserves that you can fall back on if the worst comes to the worst. If you have doubts, you can also bury an additional empty pipe string to be on the safe side, which you can then activate later if necessary. The cost of doing this is not very significant, especially compared to the extensive effort that later excavation work would entail.
7. Let the sprinkler work with different water pressures
Imagine a pipeline that supplies water to the sprinklers connected in a row one after the other. The first sprinkler gets the maximum water pressure, the last sprinkler in the row only what is left. The throwing distances of the sprinklers will therefore be very different and sprinklers that are supplied with too much pressure will also result in an unsightly, non-uniform spray pattern.
One way of avoiding this is to integrate the sprinklers into the pipeline in a sprinkler circle or in parallel rather than in a row, see sketches:

Left sprinkler circle, right parallel
An even easier option is to purchase pressure-compensating sprinklers, or if the body and nozzle are purchased separately, pressure-compensating bodies. These automatically lower the pressure to a certain value, e.g. 40 psi, so that no sprinkler receives a higher pressure. Examples of pressure-compensating bodies include Hunter’s PRS30 and PRS40 and Rain Bird’s RD1800 P30 and RD1800 P45.
| Hunter PRS-30 | Hunter PRS-40 | Rain Bird RD1800 Series P30 |
|---|---|---|
Auto Amazon Links: No products found. |
Auto Amazon Links: No products found. |
Auto Amazon Links: No products found. |
8. Do not match the precipitation rates of the sprinklers
Let’s say you have one sprinkler set for full circle, one for half circle and one for quarter circle in an irrigation sector. Problem: Each of these sprinklers releases the same amount of water in the same amount of time, with the difference that the quarter circle sprinkler runs through its quarter circle four times in the time it takes the full circle sprinkler to circle around. The lawn within the quadrant gets four times as much water in the same time. Irrigation would be completely uneven in this way. If you adjust the sprinkling duration to the lawn in the quadrant, then the lawn would get too little water in the full circle and would turn brown. Adjusting the duration for the full circle lawn will completely overwater the quarter circle lawn, which wastes water and can lead to lawn rot.
This problem can be solved in two ways:
Approximately by adjusting the nozzle sizes, i.e. using a nozzle with twice the capacity of the quarter circle in the half circle and a nozzle with four times the capacity of the quarter circle in the full circle. This principle is called in the technical jargon MPR (Matched Precipitation Rate). The method described above only solves the problem insufficiently, because the different nozzle sizes used also mean that the throw distances no longer match and the irrigation is therefore no longer absolutely even.
The second, better and also much easier way is to use sprinklers that have the MPR principle permanently integrated, i.e. make sure that the precipitation rate is always the same. They automatically adjust the amount of water released to the size of the irrigated circle section and the sprinkling radius. One of these sprinklers is the Hunter MP Rotator, which is my top sprinkler purchase recommendation due to its ease of use and the many simplifications it brings to planning.
9. Install or do not remove unnecessary bottlenecks in the system
The pipeline itself must be sized large enough, at least 3/4 inch. So far so clear, that usually works out. However, other bottlenecks that lead to significant pressure losses are often overlooked:
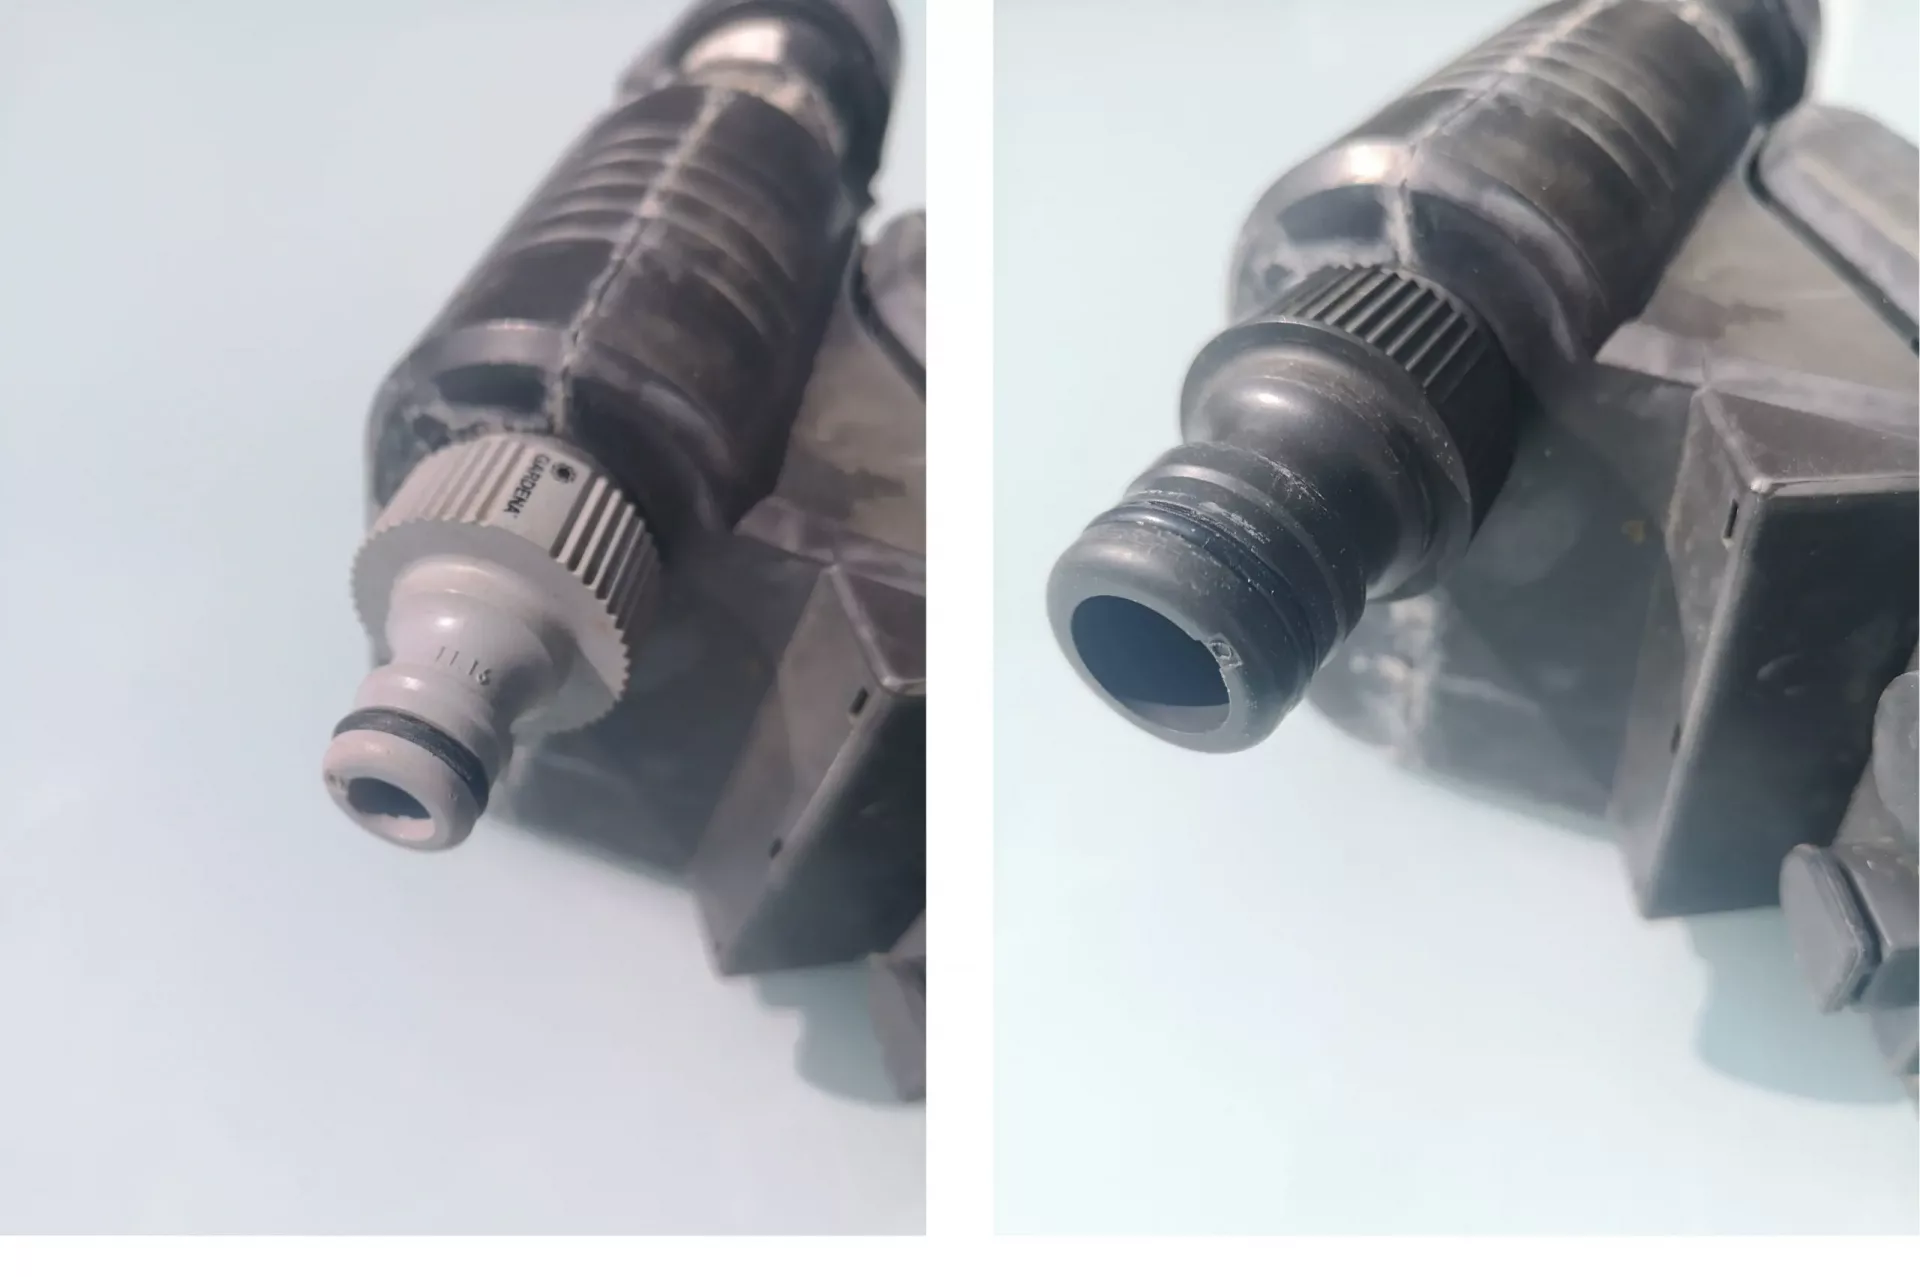
- Irrigation computers usually have a 1/2 inch tap connector at the outlet as standard. This brakes powerfully and must be replaced by a 3/4 inch tap connector. Of course, the hose connection up to the automatic water distributor or at the beginning of the pipeline should also be made with a 3/4 inch and not a 1/2 inch hose. The two comparison pictures below show the extent of the narrowing very nicely. The standard 1/2 inch tap connector on the left and the 3/4 inch tap connector on the right:
- Various other components with adapters that are too small: The 1/2 inch connections are also usually attached as standard to components such as water distributors. These should all be exchanged for 3/4 inch connections!
- Long drip irrigation pipelines: Micro-irrigation uses smaller pipeline tubing. This is also ok for the micro-irrigation itself. However, if there is a greater distance between the water source and the starting point of the micro-irrigation, e.g. 100 feets have to be covered first, then the supply line should be implemented with a large 3/4 inch pipe from ordinary irrigation. Otherwise there is already a huge loss of pressure at the starting point of the micro-irrigation. The 3/4 inch supply line should therefore be laid up to the starting point and only then go into the pressure reducer with the connected smaller drip irrigation pipe. In principle, I advise you to always go as far as possible with the large main pipeline pipe, as this way there are still pressure reserves in case of an emergency.
- In principle, the following always applies: from large to small = OK, from small to large = bad! So if the water first has to run a few feet through a small 1/2 inch diameter pipe before starting a 3/4 inch pipeline, this is bad for the water pressure. If a 3/4 inch pipeline ends up in a smaller line the last few feet to the sprinkler, this is a much smaller problem or even no problem at all.
10. Don’t compare before you buy
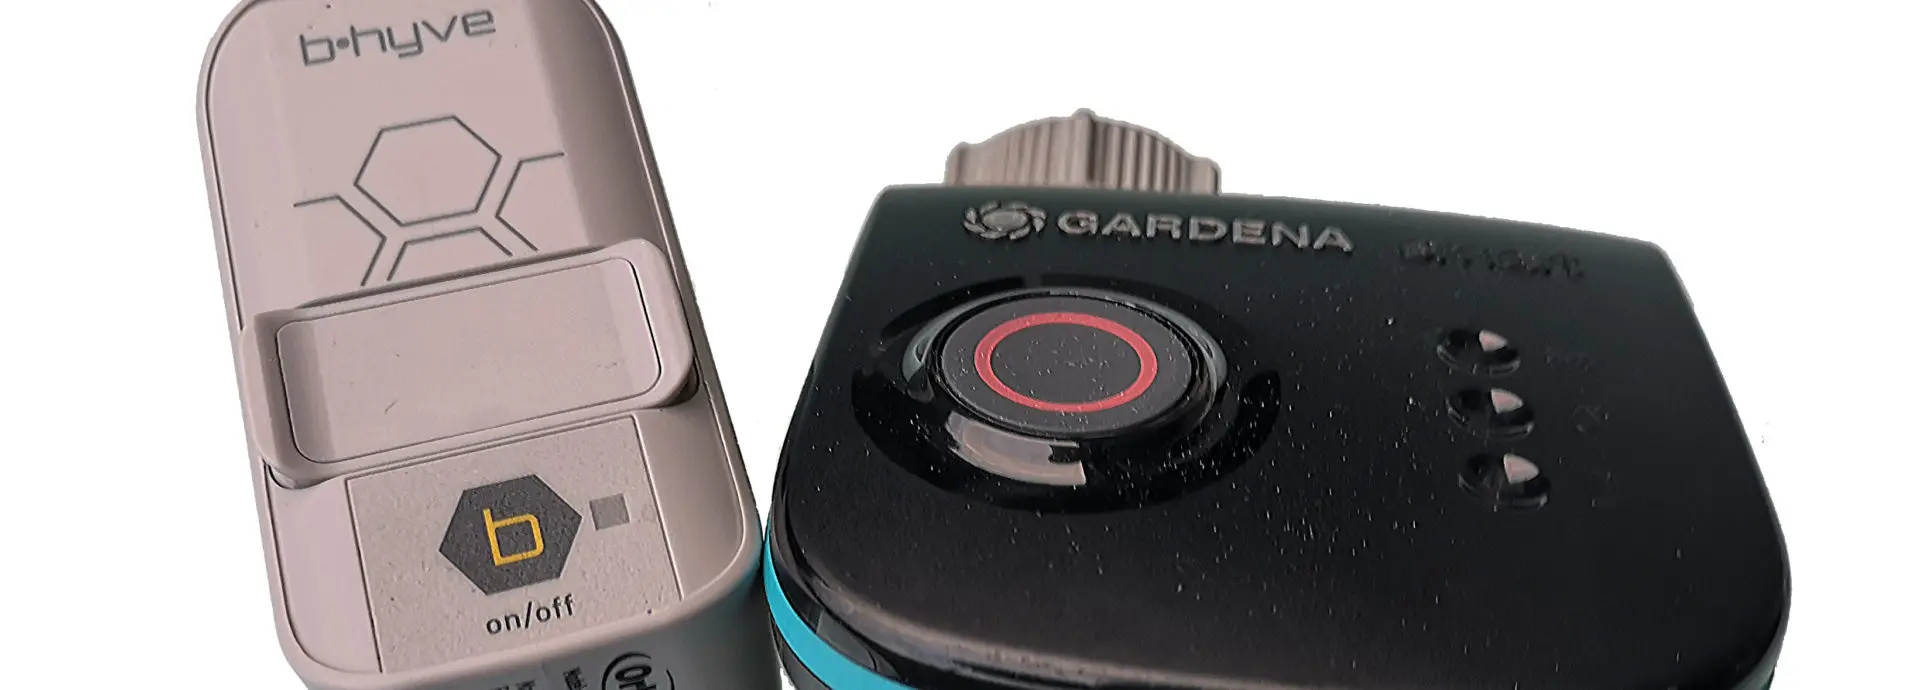
There are a number of high-quality suppliers on the irrigation market. These include above all the world market leaders Hunter, Rainbird and Toro and for some parts Gardena/Orbit. In a separate blog post, I introduce these irrigation companies:
The parts from different suppliers are usually compatible with each other, so you can mix and match across manufacturers.
